Codeigniter使用Smarty模板引擎之安裝方法
來源:程序員人生 發布時間:2014-09-06 08:19:12 閱讀次數:7502次
為Codeigniter添加Smarty模板引擎的支持,網上方法都很詳細,但是有些注意事項沒有提到,這兩天閑下來了,把具體步驟和注意事項再理一理。相信有這個需求的人對Codeigniter和Smarty都有一定了解,就對這兩個東西不做介紹了。直接進入正題。
一、安裝準備
1、Codeigniter,下載地址(下載最新版就好了)
2、Smarty,下載地址(下載最新版就好了)
3、codeigniter-smarty,下載地址 。這是個什么呢?它是一個Smarty的插件,它的作用是讓Smarty可以支持Codeigniter,就這么簡單。
二、基本原理
將Smarty集成到Codeigniter 中,
- 首先我們需要安裝Codeigniter和Smarty,并且它們能夠正常工作,這個毫無疑問。
- 其次我們需要為Smarty安裝"codeigniter-smarty"插件,讓Smarty有能力支持Codeigniter。
- 而后我們需要為Codeigniter創建一個自定義類庫,通過類庫,我們可以將Smarty和Codeigniter集成到一起去。(這是所有步驟的關鍵)
- 最后驗證安裝成功與否。
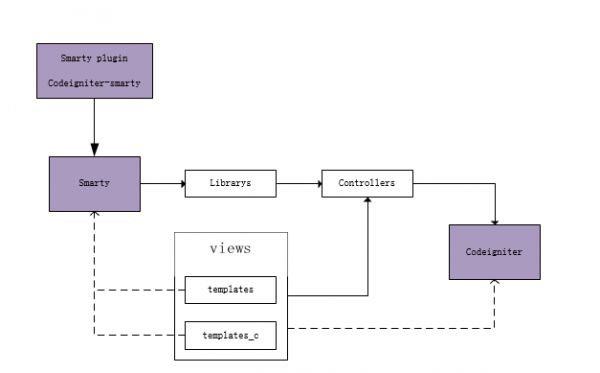
下面簡要說明一下我對這個集成框架模型的理解。如果你沒有耐心可以放心的掠過這部分,直接進入下一步,這塊是我備忘用的。下圖是框架結構的相關部分,深藍色框為框架部分,而白色框為application部分。這兩個框架的集成是在應用層進行的,兩個框架本身是不存在耦合的。在應用層通過擴展Codeigniter的類庫來引入Smarty模板引擎。在此處,我把Smarty的模板(templates)和模板編譯目錄(templates_c)全部放入了Codeigniter應用中的views視圖中,在不打破Codeigniter的MVC框架的基礎上對兩個框架進行集成,其實放到哪都可以,不過這個地方要注意模板路徑的問題。如果這么集成,Codeigniter的“$this->load->view()”方法和等會會看到的“$this->smarty->view()”的尋址路徑是不同的。并且因為路徑造成的問題,往往比較隱蔽,不容易發現。我曾在咖啡廳泡了一下午來解決這個問題(當然有點夸張,其實還有別的問題)。Smarty會根據配置的templates_dir尋找模板,而Codeigniter則到application的views中尋找模板,這個需要注意。很顯然,上述兩個方法在程序中是可以同時存在的,那么應盡量避免同時使用。

三、安裝Codeigniter
Codeigniter是一個輕量級的PHP框架,它采用MVC的思想來組織PHP程序。安裝很簡單,直接將下載的安裝包解壓后,放到你的服務器目錄下即可。具體步驟如下:
1、解壓縮Codeigniter安裝包,得到如下內容:
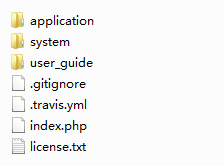
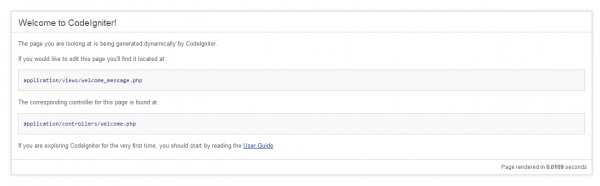
2、將這個目錄直接上傳到你的服務器的根目錄下即可,然后訪問:http://localhost。如果你看到下邊的頁面,說明你成功了。
其他說明:如果你希望修改配置等,請參考官方手冊:http://codeigniter.org.cn/user_guide/installation/index.html。上述步驟是最簡單安裝方式,但是如果上邊你安裝成功了,那么相信其他的問題都可以以此為起點一點點征服。
四、安裝Smarty
Smarty是比較著名的模板引擎,并且功能很強大,帶緩存等。Smarty安裝也是僅需要兩個步驟,解壓和上傳。
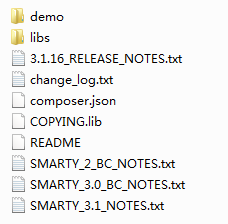
1、將下載的Smarty安裝包解壓縮,得到下邊目錄。
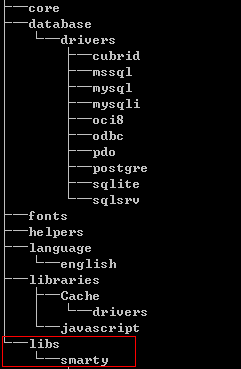
2、在Codeigniter的system目錄下建立libs/smarty目錄
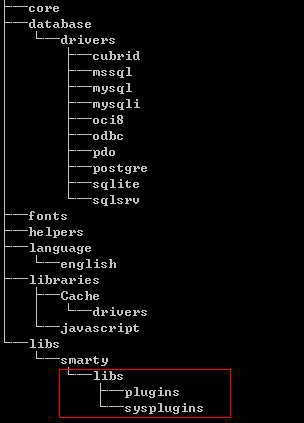
3、將smarty目錄中的libs文件夾,上傳到新建的Smarty目錄下,形成如下目錄結構
其他說明:如果你需要更高級的安裝,請參看:http://www.smarty.net/docs/zh_CN/installing.smarty.basic.tpl
五、為Smarty安裝插件codeigniter-smarty
codeigniter-smarty是一個Smarty插件,它為Smarty提供Codeigniter支持。安裝類似于Smarty其他插件的安裝,安裝和Codeigniter一毛錢關系都沒有。分為兩步,解壓和上傳。
1、解壓縮codeigniter-smarty,得到如下目錄結構:

2、進入codeigniter-smarty/libs/smarty/libs/plugins,然后將所有文件復制到localhost/system/libs/smarty/libs/plugins目錄下,就是把codeigniter-smarty中plugins中的東西都復制到smarty的plugins中,這樣就完事了。

六、為Codeigniter添加Smarty支持(關鍵步驟)
1、在application/views目錄下新建templates和templates_c兩個目錄。此處需要注意:如果你使用的是linux等系統,那么注意這兩個目錄的權限問題。
2、在application/librarys目錄下,新建Smarty.php,并寫入代碼,代碼如下:
<?php if (!defined('BASEPATH')) exit('No direct script access allowed');
/**
* Smarty Class
*
* @package CodeIgniter
* @subpackage Libraries
* @category Smarty
* @author Kepler Gelotte
* @link http://www.coolphptools.com/codeigniter-smarty
*/
//注意這個地方的路徑必須能夠找到和你的Smarty安裝路徑一致
require_once( BASEPATH.'libs/smarty/libs/Smarty.class.php' );
class CI_Smarty extends Smarty {
function CI_Smarty()
{
parent::Smarty();
$this->compile_dir = APPPATH . "views/templates_c";
$this->template_dir = APPPATH . "views/templates";
//如下四行是配置config和cache目錄,還有模板的起止標志
$this->config_dir = APPPATH . "config";
$this->cache_dir = APPPATH . "cache";
$this->left_delimiter = "<!--{";
$this->right_delimiter = "}-->";
$this->assign( 'APPPATH', APPPATH );
$this->assign( 'BASEPATH', BASEPATH );
log_message('debug', "Smarty Class Initialized");
}
function __construct()
{
parent::__construct();
$this->compile_dir = APPPATH . "views/templates_c";
$this->template_dir = APPPATH . "views/templates";
//如下四行是配置config和cache目錄,還有模板的起止標志
$this->config_dir = APPPATH . "config";
$this->cache_dir = APPPATH . "cache";
$this->left_delimiter = "<!--{";
$this->right_delimiter = "}-->";
$this->assign( 'APPPATH', APPPATH );
$this->assign( 'BASEPATH', BASEPATH );
// Assign CodeIgniter object by reference to CI
if ( method_exists( $this, 'assignByRef') )
{
$ci =& get_instance();
$this->assignByRef("ci", $ci);
}
log_message('debug', "Smarty Class Initialized");
}
/**
* Parse a template using the Smarty engine
*
* This is a convenience method that combines assign() and
* display() into one step.
*
* Values to assign are passed in an associative array of
* name => value pairs.
*
* If the output is to be returned as a string to the caller
* instead of being output, pass true as the third parameter.
*
* @access public
* @param string
* @param array
* @param bool
* @return string
*/
function view($template, $data = array(), $return = FALSE)
{
foreach ($data as $key => $val)
{
$this->assign($key, $val);
}
if ($return == FALSE)
{
$CI =& get_instance();
if (method_exists( $CI->output, 'set_output' ))
{
$CI->output->set_output( $this->fetch($template) );
}
else
{
$CI->output->final_output = $this->fetch($template);
}
return;
}
else
{
return $this->fetch($template);
}
}
}
// END Smarty Class
上述代碼,一方面是將Smarty和Codeigniter進行集成,提供一個公共的類庫,以方便調用在Codeigniter中調用Smarty,另一方面其實是對Smarty進行配置(還記得在使用Smarty模板的時候,需要配置那四個路徑嗎?這里是一樣的道理)。
3、讓Codeigniter自動加載Smarty類庫,方便調用。在codeigniter的config目錄下,修改autoload.php中的$autoload['libraries'],自動加載類庫smarty,如圖:

OK,到此我們已經完成了集成。如果你是按照上邊沒有改動就完成了的話,那恭喜你,你已經將Smarty和Codeigniter集成到一起了。這樣肯定是不放心的,來做一下簡單的測試。
七、測試框架
1、測試Smarty框架
(1)、在application中controller目錄下建立helloworld.php,并寫入代碼,代碼如下:
<?php if ( ! defined('BASEPATH')) exit('No direct script access allowed');
class Helloworld extends CI_Controller{
function __construct(){
parent::__construct();
}
public function index(){
$this->smarty->testInstall();//大家都懂得
}
}
(2)、在瀏覽器輸入:http://localhost/helloworld
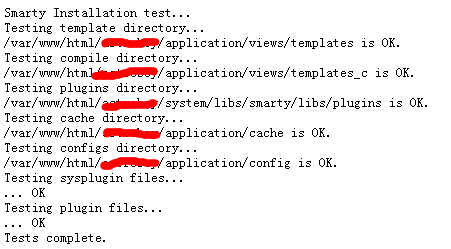
(3)、測試Smarty框架是否配置成功,如果上邊報錯,比如找不到路徑或者權限問題,那請自行修改,如果你在此處遇到其他問題,也可以給我留言。
2、測試使用Smarty框架
(1)、首先建立模板,在application/views/templates目錄下,新建模板文件index.tpl,代碼如下:
<h1>Hello,<!--{$name}--></h1>
(2)、然后建立控制器,在application/controller目錄下,新建test.php,代碼如下:
<?php if ( ! defined('BASEPATH')) exit('No direct script access allowed');
class Test extends CI_Controller{
function __construct(){
parent::__construct();
}
public function index($page='index'){
$this->smarty->assign('name', 'forevernull');
$this->smarty->view('index.tpl');
}
}
(3)、然后再瀏覽器輸入:http://localhost/test,將看到如下輸出:
(4)、OK,大功告成,終于寫完了!如果你在上邊遇到任何問題,也可以聯系我,給我留言是免費的哦!
八、總結
一直覺得挺簡單的,寫出來真的不容易。其實這兩個框架的使用是很靈活的,我只是拋磚引玉,如果你對上述過程熟悉了,你可以更改任何配置。如果你能夠讀到這里,我真的很佩服你!
九、參考資料
1、CodeIgniter+Smarty - Perfect Together
2、Codeigniter 安裝指導
3、Smarty基礎安裝
生活不易,碼農辛苦
如果您覺得本網站對您的學習有所幫助,可以手機掃描二維碼進行捐贈