尚硅谷SpringMVC代碼筆記之SpringMVC_1
來源:程序員人生 發布時間:2015-01-16 08:21:16 閱讀次數:4132次
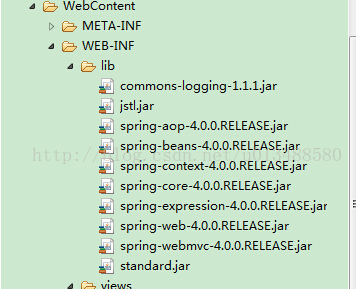
項目結構:

用來測試的index.jsp首頁視圖:
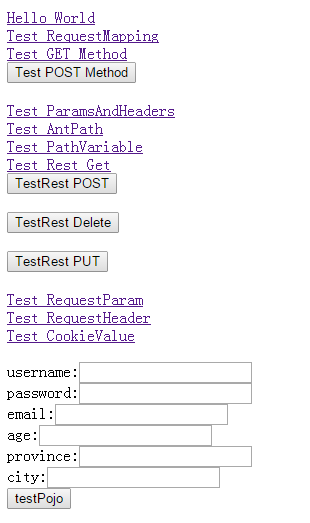
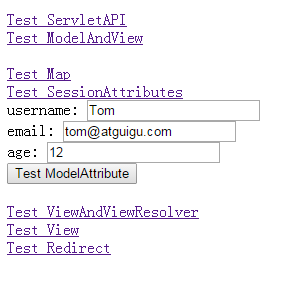
index.jsp頁面代碼:
<%@ page language="java" contentType="text/html; charset=ISO⑻859⑴"
pageEncoding="ISO⑻859⑴"%>
<!DOCTYPE html PUBLIC "-//W3C//DTD HTML 4.01 Transitional//EN" "http://www.w3.org/TR/html4/loose.dtd">
<html>
<head>
<meta http-equiv="Content-Type" content="text/html; charset=ISO⑻859⑴">
<title>Insert title here</title>
</head>
<body>
<a href="helloworld">Hello World</a>
<br>
<a href="springmvc/testRequestMapping">Test RequestMapping</a>
<br>
<!-- 默許為get要求 -->
<a href="springmvc/testMethod">Test GET Method</a>
<br>
<!-- 弄個表單,發post要求 -->
<form action="springmvc/testMethod" method="post">
<input type="submit" value="Test POST Method"/>
</form>
<br>
<a href="springmvc/testParamsAndHeaders?username=atguigu&age=11">Test ParamsAndHeaders</a>
<br>
<a href="springmvc/testAntPath/mnxyzaaa/abc">Test AntPath</a>
<br>
<a href="springmvc/testPathVariable/1">Test PathVariable</a>
<br>
<a href="springmvc/testRest/2">Test Rest Get</a>
<br>
<form action="springmvc/testRest" method="post">
<input type="submit" value="TestRest POST"/>
</form>
<br>
<form action="springmvc/testRest/3" method="post">
<input type="hidden" name="_method" value="DELETE"/>
<input type="submit" value="TestRest Delete"/>
</form>
<br>
<form action="springmvc/testRest/4" method="post">
<input type="hidden" name="_method" value="PUT"/>
<input type="submit" value="TestRest PUT"/>
</form>
<br>
<a href="springmvc/testRequestParam?username=atguigu&age=11">Test RequestParam</a>
<br>
<a href="springmvc/testRequestHeader">Test RequestHeader</a>
<br>
<a href="springmvc/testCookieValue">Test CookieValue</a>
<br><br>
<form action="springmvc/testPojo" method="post">
username:<input type="text" name="username"/>
<br>
password:<input type="password" name="password"/>
<br>
email:<input type="text" name="email"/>
<br>
age:<input type="text" name="age"/>
<br>
province:<input type="text" name="address.province"/>
<br>
city:<input type="text" name="address.city"/>
<br>
<input type="submit" value="testPojo"/>
<br>
</form>
<br>
<a href="springmvc/testServletAPI">Test ServletAPI</a>
<br>
<a href="springmvc/testModelAndView">Test ModelAndView</a>
<br>
<br>
<a href="springmvc/testMap">Test Map</a>
<br>
<a href="springmvc/testSessionAttributes">Test SessionAttributes</a>
<br>
<!--
摹擬修改操作
1. 原始數據為: 1, Tom, 123456,tom@atguigu.com,12
2. 密碼不能被修改.
3. 表單回顯, 摹擬操作直接在表單填寫對應的屬性值
-->
<form action="springmvc/testModelAttribute" method="post">
<input type="hidden" name="id" value="1"/>
username: <input type="text" name="username" value="Tom"/>
<br>
email: <input type="text" name="email" value="tom@atguigu.com"/>
<br>
age: <input type="text" name="age" value="12"/>
<br>
<input type="submit" value="Test ModelAttribute"/>
</form>
<br>
<a href="springmvc/testViewAndViewResolver">Test ViewAndViewResolver</a>
<br>
<a href="springmvc/testView">Test View</a>
<br>
<a href="springmvc/testRedirect">Test Redirect</a>
<br><br><br>
</body>
</html>
實體類:
package com.atguigu.springmvc.entities;
public class User {
private Integer id;
private String username;
private String password;
private String email;
private int age;
public Address address;
public Integer getId() {
return id;
}
public void setId(Integer id) {
this.id = id;
}
public String getUsername() {
return username;
}
public void setUsername(String username) {
this.username = username;
}
public String getPassword() {
return password;
}
public void setPassword(String password) {
this.password = password;
}
public String getEmail() {
return email;
}
public void setEmail(String email) {
this.email = email;
}
public int getAge() {
return age;
}
public void setAge(int age) {
this.age = age;
}
public Address getAddress() {
return address;
}
public void setAddress(Address address) {
this.address = address;
}
@Override
public String toString() {
return "User [id=" + id + ", username=" + username + ", password="
+ password + ", email=" + email + ", age=" + age + ", address="
+ address + "]";
}
public User(String username, String password, String email, int age) {
super();
this.username = username;
this.password = password;
this.email = email;
this.age = age;
}
public User(Integer id, String username, String password, String email,
int age) {
super();
this.id = id;
this.username = username;
this.password = password;
this.email = email;
this.age = age;
}
public User() {}
}
package com.atguigu.springmvc.entities;
public class Address {
private String province; // 省
private String city; // 市
public String getProvince() {
return province;
}
public void setProvince(String province) {
this.province = province;
}
public String getCity() {
return city;
}
public void setCity(String city) {
this.city = city;
}
@Override
public String toString() {
return "Address [province=" + province + ", city=" + city + "]";
}
}
自定義視圖類:
package com.atguigu.springmvc.views;
import java.util.Date;
import java.util.Map;
import javax.servlet.http.HttpServletRequest;
import javax.servlet.http.HttpServletResponse;
import org.springframework.stereotype.Component;
import org.springframework.web.servlet.View;
@Component
public class HelloView implements View {
@Override
public String getContentType() {
return "text/html";
}
@Override
public void render(Map<String, ?> model, HttpServletRequest request,
HttpServletResponse response) throws Exception {
response.getWriter().print("hello view, time: " + new Date());
}
}
控制器SpringMVCTest文件代碼:
package com.atguigu.springmvc.handlers;
import java.io.IOException;
import java.io.Writer;
import java.util.Arrays;
import java.util.Date;
import java.util.Map;
import javax.servlet.http.HttpServletRequest;
import javax.servlet.http.HttpServletResponse;
import org.springframework.stereotype.Controller;
import org.springframework.web.bind.annotation.CookieValue;
import org.springframework.web.bind.annotation.ModelAttribute;
import org.springframework.web.bind.annotation.PathVariable;
import org.springframework.web.bind.annotation.RequestHeader;
import org.springframework.web.bind.annotation.RequestMapping;
import org.springframework.web.bind.annotation.RequestMethod;
import org.springframework.web.bind.annotation.RequestParam;
import org.springframework.web.bind.annotation.SessionAttributes;
import org.springframework.web.servlet.ModelAndView;
import com.atguigu.springmvc.entities.User;
@SessionAttributes(value={"user"},types={String.class})
@RequestMapping("/springmvc")
@Controller
public class SpringMVCTest {
private static final String SUCCESS="success";
/**
* 1. @RequestMapping 除修飾方法, 還可來修飾類
* 2.
* 1). 類定義處: 提供初步的要求映照信息。相對 WEB 利用的根目錄
* 2). 方法處: 提供進1步的細分映照信息。 相對類定義處的 URL。若類定義處未標注 @RequestMapping,則方法處標記的 URL
* 相對 WEB 利用的根目錄
*/
@RequestMapping("/testRequestMapping")
public String testRequestMapping(){
System.out.println("testRequestMapping");
return SUCCESS;
}
/**
* 經常使用: 使用 method 屬性來指定要求方式
*/
@RequestMapping(value="/testMethod",method=RequestMethod.POST)
public String testMethod(){
System.out.println("testMethod");
return SUCCESS;
}
/**
* 了解: 可使用 params 和 headers 來更加精確的映照要求. params 和 headers 支持簡單的表達式.
*
* @return
*/
@RequestMapping(value="testParamsAndHeaders",params={"username","age!=10"},
headers = { "Accept-Language=zh-CN,zh;q=0.8" })
public String testParamsAndHeaders(){
System.out.println("testParamsAndHeaders");
return SUCCESS;
}
/**
* 支持通配符
* @return
*/
@RequestMapping("/testAntPath/*/abc")
public String testAntPath(){
System.out.println("testAntPath");
return SUCCESS;
}
/**
* @PathVariable 可以來映照 URL 中的占位符到目標方法的參數中.
* @param id
* @return
*/
@RequestMapping("/testPathVariable/{id}")
public String testPathVariable(@PathVariable("id") Integer id){
return SUCCESS;
}
/**
* Rest 風格的 URL. 以 CRUD 為例:
* 新增: /order POST
* 修改: /order/1 PUT update?id=1
* 獲得:/order/1 GET get?id=1
* 刪除: /order/1 DELETE delete?id=1
*
* 如何發送 PUT 要求和 DELETE 要求呢 ?
* 1. 需要配置 HiddenHttpMethodFilter
* 2. 需要發送 POST 要求
* 3. 需要在發送 POST 要求時攜帶1個 name="_method" 的隱藏域, 值為 DELETE 或 PUT
*
* 在 SpringMVC 的目標方法中如何得到 id 呢? 使用 @PathVariable 注解
*/
@RequestMapping(value="/testRest/{id}",method=RequestMethod.GET)
public String testRest(@PathVariable Integer id){
System.out.println("testRest GET:"+id);
return SUCCESS;
}
@RequestMapping(value="/testRest",method=RequestMethod.POST)
public String testRest(){
System.out.println("testRest POST");
return SUCCESS;
}
@RequestMapping(value="/testRest/{id}",method=RequestMethod.DELETE)
public String testRestDelete(@PathVariable Integer id){
System.out.println("testRest Delete:"+id);
return SUCCESS;
}
@RequestMapping(value="/testRest/{id}",method=RequestMethod.PUT)
public String testRestPut(@PathVariable Integer id){
System.out.println("testRest Put: " + id);
return SUCCESS;
}
/**
* @RequestParam 來映照要求參數. value 值即要求參數的參數名 required 該參數是不是必須. 默許為 true
* defaultValue 要求參數的默許值
*/
@RequestMapping(value="/testRequestParam")
public String testRequestParam(@RequestParam(value="username") String un,
@RequestParam(value="age",required=false,defaultValue="0") int age){
System.out.println("testRequestParam, username: " + un + ", age: "
+ age);
return SUCCESS;
}
/**
* 了解: 映照要求頭信息 用法同 @RequestParam
*/
@RequestMapping("/testRequestHeader")
public String testRequestHeader(
@RequestHeader(value = "Accept-Language") String al) {
System.out.println("testRequestHeader, Accept-Language: " + al);
return SUCCESS;
}
/**
* 了解:
*
* @CookieValue: 映照1個 Cookie 值. 屬性同 @RequestParam
*/
@RequestMapping("/testCookieValue")
public String testCookieValue(@CookieValue("JSESSIONID") String sessionId) {
System.out.println("testCookieValue: sessionId: " + sessionId);
return SUCCESS;
}
/**
* Spring MVC 會按要求參數名和 POJO 屬性名進行自動匹配, 自動為該對象填充屬性值。支持級聯屬性。
* 如:dept.deptId、dept.address.tel 等
*/
@RequestMapping("/testPojo")
public String testPojo(User user){
System.out.println("testPojo: " + user);
return SUCCESS;
}
/**
* 可使用 Serlvet 原生的 API 作為目標方法的參數 具體支持以下類型
*
* HttpServletRequest
* HttpServletResponse
* HttpSession
* java.security.Principal
* Locale
* InputStream
* OutputStream
* Reader
* Writer
* @throws IOException
*/
@RequestMapping("/testServletAPI")
public void testServletAPI(HttpServletRequest request,HttpServletResponse response,
Writer out) throws IOException{
System.out.println("testServletAPI, " + request + ", " + response);
out.write("hello springmvc");
//return SUCCESS;
}
/**
* 目標方法的返回值可以是 ModelAndView 類型。
* 其中可以包括視圖和模型信息
* SpringMVC 會把 ModelAndView 的 model 中數據放入到 request 域對象中.
* @return
*/
@RequestMapping("/testModelAndView")
public ModelAndView testModelAndView(){
String viewName=SUCCESS;
ModelAndView mv=new ModelAndView(viewName);
//添加模型數據到 ModelAndView 中.
mv.addObject("time", new Date());
return mv;
}
/**
* 目標方法可以添加 Map 類型(實際上也能夠是 Model 類型或 ModelMap 類型)的參數.
* @param map
* @return
*/
@RequestMapping("/testMap")
public String testMap(Map<String,Object> map){
System.out.println(map.getClass().getName());
map.put("names", Arrays.asList("Tom","Jerry","Mike"));
return SUCCESS;
}
/**
* @SessionAttributes 除可以通過屬性名指定需要放到會話中的屬性外(實際上使用的是 value 屬性值),
* 還可以通過模型屬性的對象類型指定哪些模型屬性需要放到會話中(實際上使用的是 types 屬性值)
*
* 注意: 該注解只能放在類的上面. 而不能修飾放方法.
*/
@RequestMapping("/testSessionAttributes")
public String testSessionAttributes(Map<String,Object> map){
User user=new User("Tom", "123456", "tom@atguigu.com", 15);
map.put("user", user);
map.put("shool", "atguigu");
return SUCCESS;
}
/**
* 運行流程:
* 1. 履行 @ModelAttribute 注解修飾的方法: 從
數據庫中取出對象, 把對象放入到了 Map 中. 鍵為: user
* 2. SpringMVC 從 Map 中取出 User 對象, 并把表單的要求參數賦給該 User 對象的對應屬性.
* 3. SpringMVC 把上述對象傳入目標方法的參數.
*
* 注意: 在 @ModelAttribute 修飾的方法中, 放入到 Map 時的鍵需要和目標方法入參類型的第1個字母小寫的字符串1致!
*
* SpringMVC 肯定目標方法 POJO 類型入參的進程
* 1. 肯定1個 key:
* 1). 若目標方法的 POJO 類型的參數木有使用 @ModelAttribute 作為修飾, 則 key 為 POJO 類名第1個字母的小寫
* 2). 若使用了 @ModelAttribute 來修飾, 則 key 為 @ModelAttribute 注解的 value 屬性值.
* 2. 在 implicitModel 中查找 key 對應的對象, 若存在, 則作為入參傳入
* 1). 若在 @ModelAttribute 標記的方法中在 Map 中保存過, 且 key 和 1 肯定的 key 1致, 則會獲得到.
* 3. 若 implicitModel 中不存在 key 對應的對象, 則檢查當前的 Handler 是不是使用 @SessionAttributes 注解修飾,
* 若使用了該注解, 且 @SessionAttributes 注解的 value 屬性值中包括了 key, 則會從 HttpSession 中來獲得 key 所
* 對應的 value 值, 若存在則直接傳入到目標方法的入參中. 若不存在則將拋出異常.
* 4. 若 Handler 沒有標識 @SessionAttributes 注解或 @SessionAttributes 注解的 value 值中不包括 key, 則
* 會通過反射來創建 POJO 類型的參數, 傳入為目標方法的參數
* 5. SpringMVC 會把 key 和 POJO 類型的對象保存到 implicitModel 中, 進而會保存到 request 中.
*
* 源代碼分析的流程
* 1. 調用 @ModelAttribute 注解修飾的方法. 實際上把 @ModelAttribute 方法中 Map 中的數據放在了 implicitModel 中.
* 2. 解析要求處理器的目標參數, 實際上該目標參數來自于 WebDataBinder 對象的 target 屬性
* 1). 創建 WebDataBinder 對象:
* ①. 肯定 objectName 屬性: 若傳入的 attrName 屬性值為 "", 則 objectName 為類名第1個字母小寫.
* *注意: attrName. 若目標方法的 POJO 屬性使用了 @ModelAttribute 來修飾, 則 attrName 值即為 @ModelAttribute
* 的 value 屬性值
*
* ②. 肯定 target 屬性:
* > 在 implicitModel 中查找 attrName 對應的屬性值. 若存在, ok
* > *若不存在: 則驗證當前 Handler 是不是使用了 @SessionAttributes 進行修飾, 若使用了, 則嘗試從 Session 中
* 獲得 attrName 所對應的屬性值. 若 session 中沒有對應的屬性值, 則拋出了異常.
* > 若 Handler 沒有使用 @SessionAttributes 進行修飾, 或 @SessionAttributes 中沒有使用 value 值指定的 key
* 和 attrName 相匹配, 則通過反射創建了 POJO 對象
*
* 2). SpringMVC 把表單的要求參數賦給了 WebDataBinder 的 target 對應的屬性.
* 3). *SpringMVC 會把 WebDataBinder 的 attrName 和 target 給到 implicitModel.
* 近而傳到 request 域對象中.
* 4). 把 WebDataBinder 的 target 作為參數傳遞給目標方法的入參.
*/
@RequestMapping("/testModelAttribute")
public String testModelAttribute(User user){
System.out.println("修改:"+user);
return SUCCESS;
}
/**
* 1. 有 @ModelAttribute 標記的方法, 會在每一個目標方法履行之前被 SpringMVC 調用!
* 2. @ModelAttribute 注解也能夠來修飾目標方法 POJO 類型的入參, 其 value 屬性值有以下的作用:
* 1). SpringMVC 會使用 value 屬性值在 implicitModel 中查找對應的對象, 若存在則會直接傳入到目標方法的入參中.
* 2). SpringMVC 會以value 為 key, POJO 類型的對象為 value, 存入到 request 中.
*/
@ModelAttribute
public void getUser(@RequestParam(value="id",required=false) Integer id,
Map<String,Object> map){
System.out.println("modelAttribute method");
if(null!=id){
//摹擬從
數據庫中獲得對象
User user=new User(1, "Tom", "123456", "tom@atguigu.com", 12);
System.out.println("從
數據庫中取1個對象:"+user);
map.put("user", user);
}
}
/**
* 測試視圖和視圖解析器
* @return
*/
@RequestMapping("/testViewAndViewResolver")
public String testViewAndViewResolver(){
System.out.println("testViewAndViewResolver");
return SUCCESS;
}
/**
* 測試 視圖 BeanNameViewResolver 解析器(需要在springmvc配置文件中配置對應的bean)
* @return
*/
@RequestMapping("/testView")
public String testView(){
System.out.println("testView");
return "helloView";
}
@RequestMapping("/testRedirect")
public String testRedirect(){
System.out.println("testRedirect");
return "redirect:/index.jsp";
}
}
跳轉頁面sucess頁面代碼:
<%@ page language="java" contentType="text/html; charset=ISO⑻859⑴"
pageEncoding="ISO⑻859⑴"%>
<%@ taglib prefix="ftm" uri="http://java.sun.com/jsp/jstl/fmt" %>
<!DOCTYPE html PUBLIC "-//W3C//DTD HTML 4.01 Transitional//EN" "http://www.w3.org/TR/html4/loose.dtd">
<html>
<head>
<meta http-equiv="Content-Type" content="text/html; charset=ISO⑻859⑴">
<title>Insert title here</title>
</head>
<body>
<h4>Sucess Page</h4>
time: ${requestScope.time}
<br>
names: ${requestScope.names }
<br>
request user: ${requestScope.user }
<br>
session user: ${sessionScope.user }
<br><br>
<ftm:message key="i18n.username"></ftm:message>
<br><br>
<ftm:message key="i18n.password"></ftm:message>
<br><br>
</body>
</html>
SpringMVC配置文件 springmvc.xml代碼:
<?xml version="1.0" encoding="UTF⑻"?>
<beans xmlns="http://www.springframework.org/schema/beans"
xmlns:xsi="http://www.w3.org/2001/XMLSchema-instance"
xmlns:context="http://www.springframework.org/schema/context"
xmlns:mvc="http://www.springframework.org/schema/mvc"
xsi:schemaLocation="http://www.springframework.org/schema/mvc http://www.springframework.org/schema/mvc/spring-mvc⑷.0.xsd
http://www.springframework.org/schema/beans http://www.springframework.org/schema/beans/spring-beans.xsd
http://www.springframework.org/schema/context http://www.springframework.org/schema/context/spring-context⑷.0.xsd">
<!-- 配置自動掃描的包 -->
<context:component-scan base-package="com.atguigu.springmvc"/>
<!-- 配置視圖解析器: 如何把 handler 方法返回值解析為實際的物理視圖 -->
<bean class="org.springframework.web.servlet.view.InternalResourceViewResolver">
<property name="prefix" value="/WEB-INF/views/"></property>
<property name="suffix" value=".jsp"></property>
</bean>
<!-- 配置視圖 BeanNameViewResolver 解析器: 使用視圖的名字來解析視圖 -->
<!-- 通過 order 屬性來定義視圖解析器的優先級, order 值越小優先級越高 -->
<bean class="org.springframework.web.servlet.view.BeanNameViewResolver">
<property name="order" value="100"/>
</bean>
<!-- 配置國際化資源文件 -->
<bean id="messageSource"
class="org.springframework.context.support.ResourceBundleMessageSource">
<property name="basename" value="i18n"></property>
</bean>
<!-- 配置直接轉發的頁面 -->
<!-- 可以直接相應轉發的頁面, 而無需再經過 Handler 的方法. -->
<mvc:view-controller path="/success" view-name="success"/>
<!-- 在實際開發中通常都需配置 mvc:annotation-driven 標簽 -->
<mvc:annotation-driven></mvc:annotation-driven>
</beans>
web.xml代碼:
<?xml version="1.0" encoding="UTF⑻"?>
<web-app xmlns:xsi="http://www.w3.org/2001/XMLSchema-instance" xmlns="http://java.sun.com/xml/ns/javaee" xsi:schemaLocation="http://java.sun.com/xml/ns/javaee http://java.sun.com/xml/ns/javaee/web-app_3_0.xsd" id="WebApp_ID" version="3.0">
<display-name>SpringMVC_1</display-name>
<welcome-file-list>
<welcome-file>index.jsp</welcome-file>
</welcome-file-list>
<!-- 配置 DispatcherServlet -->
<servlet>
<servlet-name>springDispatcherServlet</servlet-name>
<servlet-class>org.springframework.web.servlet.DispatcherServlet</servlet-class>
<!-- 配置 DispatcherServlet 的1個初始化參數: 配置 SpringMVC 配置文件的位置和名稱 -->
<init-param>
<param-name>contextConfigLocation</param-name>
<param-value>classpath:springmvc.xml</param-value>
</init-param>
<load-on-startup>1</load-on-startup>
</servlet>
<servlet-mapping>
<servlet-name>springDispatcherServlet</servlet-name>
<url-pattern>/</url-pattern>
</servlet-mapping>
<!--
配置 org.springframework.web.filter.HiddenHttpMethodFilter: 可以把 POST 要求轉為 DELETE 或 POST 要求
-->
<filter>
<filter-name>HiddenHttpMethodFilter</filter-name>
<filter-class>org.springframework.web.filter.HiddenHttpMethodFilter</filter-class>
</filter>
<filter-mapping>
<filter-name>HiddenHttpMethodFilter</filter-name>
<url-pattern>/*</url-pattern>
</filter-mapping>
</web-app>
生活不易,碼農辛苦
如果您覺得本網站對您的學習有所幫助,可以手機掃描二維碼進行捐贈


