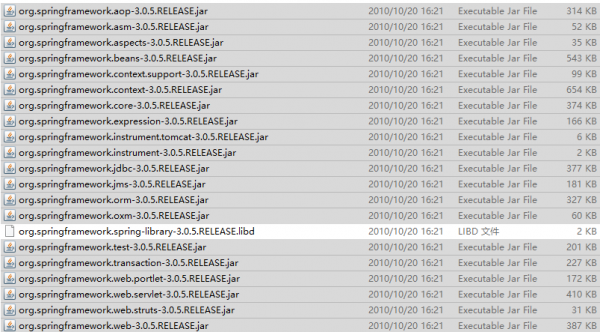
1、搭建環(huán)境
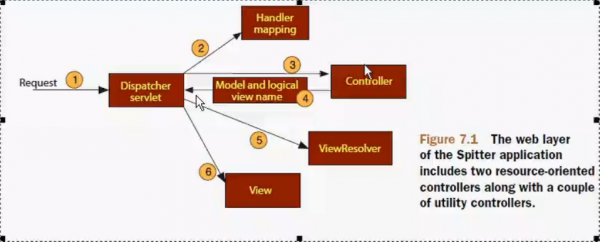
2、如何完成Controller和Viewer的映照
3、如何把值傳遞給Controller
6、頁面標(biāo)簽
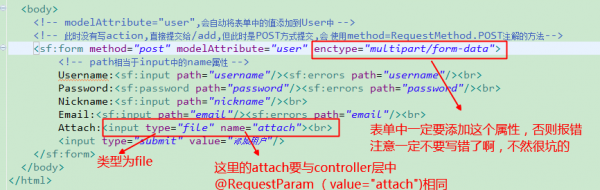
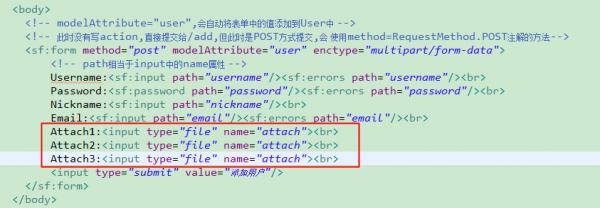
7、文件上傳
8、深入1下源代碼

  <servlet>
    <servlet-name>springmvc</servlet-name>
    <servlet-class>org.springframework.web.servlet.DispatcherServlet</servlet-class>
    <!-- 如果不配置這個,那末 就必須在/WEB-IN/下創(chuàng)建文件名為springmvc-servlet的.xml文件-->
    <init-param>
        <param-name>contextConfigLocation</param-name>
        <!-- 在src目錄下或自己創(chuàng)建的"Source Floder"目錄下新建springmvc.xml -->
        <param-value>classpath:springmvc.xml</param-value>
    </init-param>
    <load-on-startup>1</load-on-startup>
  </servlet>
  <servlet-mapping>
    <servlet-name>springmvc</servlet-name>
    <url-pattern>/</url-pattern>
</servlet-mapping><?xml version="1.0" encoding="UTF⑻"?>
<beans xmlns="http://www.springframework.org/schema/beans"
xmlns:xsi="http://www.w3.org/2001/XMLSchema-instance"
xmlns:aop="http://www.springframework.org/schema/aop"
xmlns:context="http://www.springframework.org/schema/context"
xmlns:mvc="http://www.springframework.org/schema/mvc"
xsi:schemaLocation="http://www.springframework.org/schema/beans http://www.springframework.org/schema/beans/spring-beans⑶.0.xsd
http://www.springframework.org/schema/aop http://www.springframework.org/schema/aop/spring-aop⑶.0.xsd
http://www.springframework.org/schema/context http://www.springframework.org/schema/context/spring-context⑶.0.xsd
http://www.springframework.org/schema/mvc http://www.springframework.org/schema/mvc/spring-mvc⑶.0.xsd">
</beans><!-- 非注解方式 -->
<bean name="/welcome.html" class="com.wen.controller.WelcomeController"></bean>
<!-- 配置視圖解析器 -->
<bean id="viewResolver" class="org.springframework.web.servlet.view.InternalResourceViewResolver">
<property name="prefix" value="/WEB-INF/jsp/"/>
<property name="suffix" value=".jsp"/>
</bean>WellcomeController.java代碼以下:
public class WelcomeController extends AbstractController {

    @Override
    protected ModelAndView handleRequestInternal(HttpServletRequest req,
            HttpServletResponse resp) throws Exception {
        System.out.println("Welcome");
        ModelAndView mav = new ModelAndView();
        //則返回的視圖為/WEB-INF/jsp/welcome.jsp
        mav.setViewName("welcome");
        //在wellcome.jsp中可使用${msg}獲得'welcome to spring MVC'
        mav.addObject("msg", "welcome to spring MVC");
        return mav;
    }

}
上面這類非注解方式來映照視圖的方式幾近不會使用
springmvc.xml的配置以下:
<!-- 使用注解方式 -->
<!-- 打開注解 -->
<mvc:annotation-driven/>
<!-- 掃描包 -->
<context:component-scan base-package="com.wen.controller"/>

<!-- 配置視圖解析器 -->
<bean id="viewResolver" class="org.springframework.web.servlet.view.InternalResourceViewResolver">
    <property name="prefix" value="/WEB-INF/jsp/"/>
    <property name="suffix" value=".jsp"/>
</bean>
HelloController.java代碼以下:
//@RequestMapping表示用哪一個url來對應(yīng)
@RequestMapping(value={"/hello","/"})
//@RequestParam注解參數(shù)
//如http://xxx/hello?username=zhangsan
//使用Map<String, Object> context來將數(shù)據(jù)傳遞到hello.jsp頁面
public String hello(@RequestParam(value="username",required=false)String name, Map<String, Object> context){
    System.out.println("hello " + name);
    context.put("username", name);
    return "hello";
}
但更建議使用Model來傳遞數(shù)據(jù),代碼以下
@RequestMapping(value="welcome")
public String welcome(String username,Model model){
    //使用model.addAttribute來傳遞數(shù)據(jù)
    //如http://xxx/welcome?username=zhangsan
    model.addAttribute("msg", "welcome to spring MVC");
    model.addAttribute("name", username);
    return "welcome";
}REST的風(fēng)格不等于使用了REST技術(shù)
user為路徑,120為user_id
查詢用戶:user/120———————查詢id=120的用戶
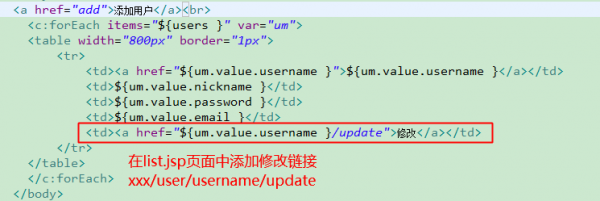
刪除用戶:user/120/delete————刪除id=120的用戶
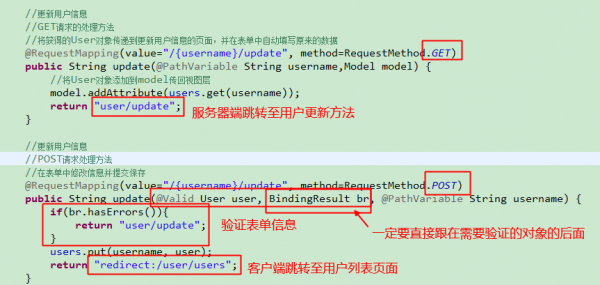
更新用戶:user/120/update———–更新id=120的用戶信息
1些技能
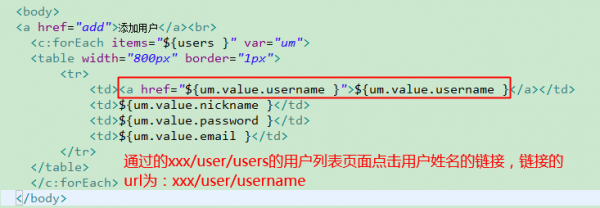
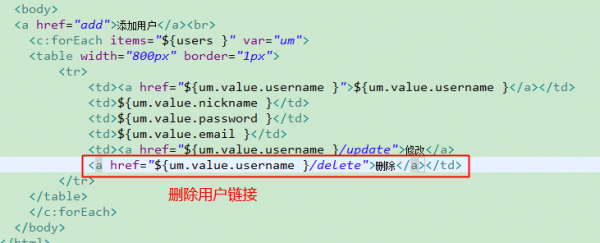
當(dāng)jsp頁面中需要使用標(biāo)簽庫時(如:需要使用< c:forEach>)
1.首先需要導(dǎo)入jstl⑴.x.jar包

2.需要在jsp頁面中加入以下代碼:
<%@ taglib prefix="c" uri="http://java.sun.com/jsp/jstl/core" %>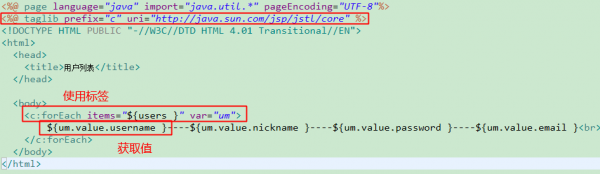
3.同時,需要在springmvc.xml的視圖解析器配置中加入以下代碼:
<!-- 當(dāng)要使用taglib標(biāo)簽庫是,需要配置這個屬性。但spring3.0.5以后默許會加上這個屬性 -->
<property name="viewClass" value="org.springframework.web.servlet.view.JstlView"/>
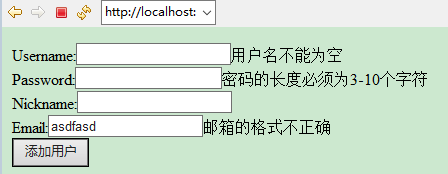
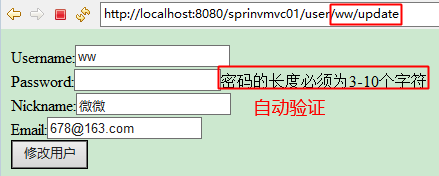
如果要使用驗證,則需要導(dǎo)入下面這個包

JSR303使用幫助
用法舉例:
在User.java中的get方法上面使用驗證注解
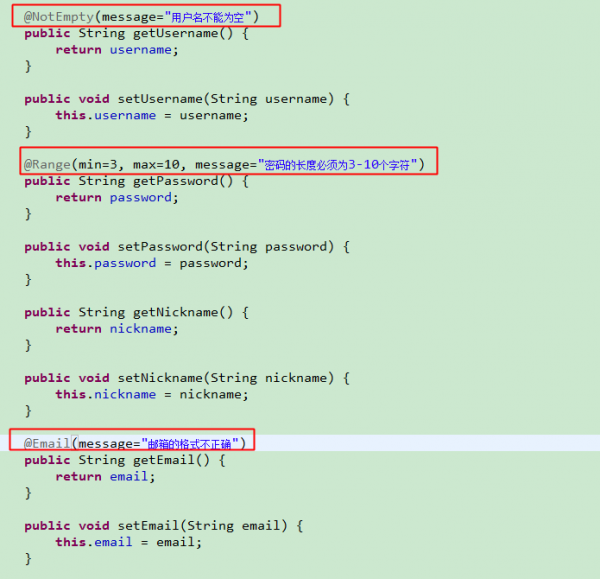
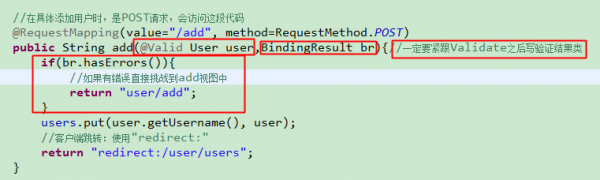
在Controller方法中:
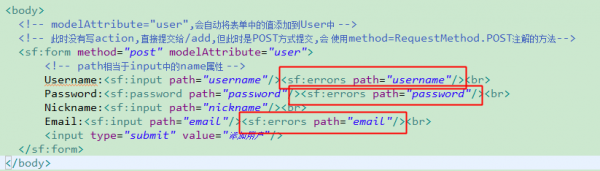
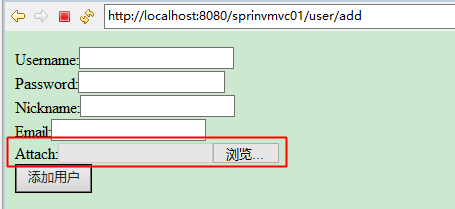
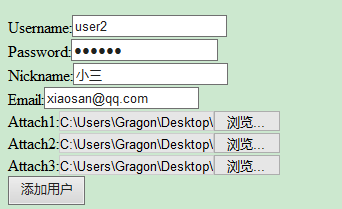
在add.jsp中:
結(jié)果以下:
public class User {
    private String username;
    private String password;
    private String nickname;
    private String email;

    //默許構(gòu)造函數(shù)
    public User(){

    }

    public User(String username, String password, String nickname, String email) {
        super();
        this.username = username;
        this.password = password;
        this.nickname = nickname;
        this.email = email;
    }

//省略setter和getter方法<%@ page language="java" import="java.util.*" pageEncoding="UTF⑻"%>
<%@ taglib prefix="sf" uri="http://www.springframework.org/tags/form" %>
<!DOCTYPE HTML PUBLIC "-//W3C//DTD HTML 4.01 Transitional//EN">
<html>
<head>
<meta http-equiv="Content-Type" content="text/html;charset=UTF⑻">
<title>添加用戶</title>
</head>
<body>
<!-- modelAttribute="user",會自動將表單中的值添加到User中 -->
<!-- 此時沒有寫action,直接提交給/add,但此時是POST方式提交,會 使用method=RequestMethod.POST注解的方法-->
<sf:form method="post" modelAttribute="user">
<!-- path相當(dāng)于input中的name屬性 -->
Username:<sf:input path="username"/><br>
Password:<sf:password path="password"/><br>
Nickname:<sf:input path="nickname"/><br>
Email:<sf:input path="email"/><br>
<input type="submit" value="添加用戶"/>
</sf:form>
</body>
</html>@Controller
@RequestMapping("/user")
public class UserController {
private Map<String, User> users = new HashMap<String, User>();
//默許構(gòu)造函數(shù)
public UserController(){
users.put("zs", new User("zs", "123", "張3", "123@163.com"));
users.put("ls", new User("ls", "123", "李4", "234@163.com"));
users.put("we", new User("we", "123", "王5", "345@163.com"));
users.put("sj", new User("sj", "123", "世杰", "456@163.com"));
users.put("yp", new User("yp", "123", "1平", "567@163.com"));
users.put("ww", new User("ww", "123", "微微", "678@163.com"));
}
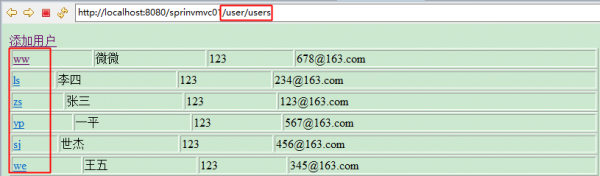
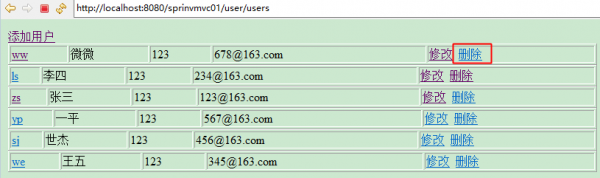
@RequestMapping(value="/users", method=RequestMethod.GET)
public String list(Model model){
model.addAttribute("users", users);
return "user/list";
}
//連接到add頁面時是GET要求,會訪問這段代碼
@RequestMapping(value="/add", method=RequestMethod.GET)
public String add(Model model){
//必須添加1個User,不然在add.jsp中
//modelAttribute="user"的user沒法獲得
model.addAttribute(new User());
//服務(wù)器端跳轉(zhuǎn):自動加上"forward:"
return "user/add";
}
//除上面1種方式,我更喜歡下面這類
//@RequestMapping(value="/add", method=RequestMethod.GET)
//public String add(@ModelAttribute("user") User user){
// return "user/add";
//}
//在具體添加用戶時,是POST要求,會訪問這段代碼
@RequestMapping(value="/add", method=RequestMethod.POST)
public String add(User user){
users.put(user.getUsername(), user);
//客戶端跳轉(zhuǎn):使用"redirect:"
return "redirect:/user/users";
}
}由于在頁面中使用了中文,需要在web.xml中添加字符編碼過濾器
  <!-- 編碼過濾器 -->
  <filter>
    <filter-name>CharacterEncodingFilter</filter-name>
    <filter-class>org.springframework.web.filter.CharacterEncodingFilter</filter-class>
    <init-param>
        <param-name>encoding</param-name>
        <param-value>UTF⑻</param-value>
    </init-param>
  </filter>
  <filter-mapping>
    <filter-name>CharacterEncodingFilter</filter-name>
    <url-pattern>/*</url-pattern>
  </filter-mapping>
2016⑼⑵0 23:28:32 未完待續(xù)
接續(xù):
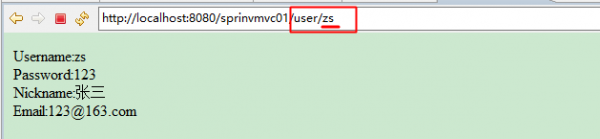
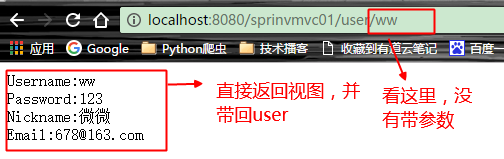
//顯示某個用戶的方法
//@PathVariable String username表示使用路徑中的{username}來最為參數(shù)
@RequestMapping(value="/{username}", method=RequestMethod.GET)
public String show(@PathVariable String username, Model model){
    //通過username取得User對象
    //在show.jsp頁面中通過${user}來獲得對象
    model.addAttribute(users.get(username));
    return "user/show";
}


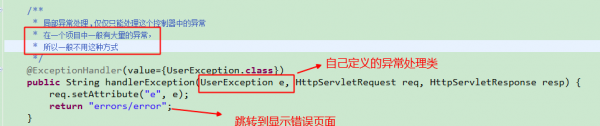
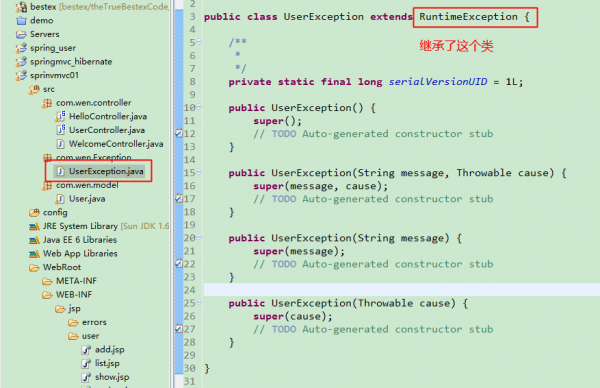
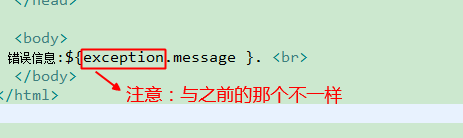
上面這類異常處理只能處理局部異常,不太好用,所以需要進(jìn)行前期的異常處理,可以在springmvc.xml配置文件中來配置。

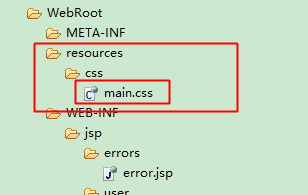
由于在web.xml中配置的DispatchServlet攔截的路徑為”/”
所以靜態(tài)文件也將被servlet攔截,從而沒法獲得
所以需要在在springmvc.xml中為靜態(tài)文件進(jìn)行配置,配置以下
在頁面中引入靜態(tài)文件:
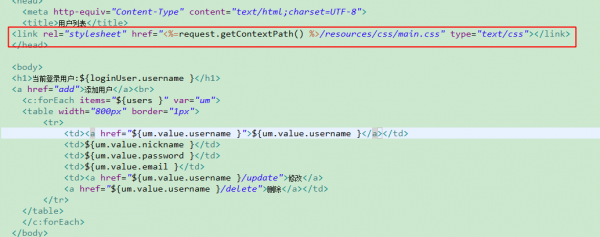
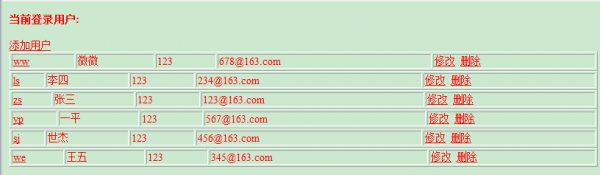
顯示結(jié)果以下:
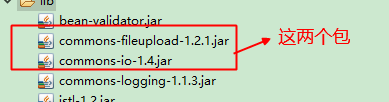
*這里盡可能用最新的jar包,將我用的commons-io⑴.4換成commons-io⑵.x.jar版本
不然后面會有問題*
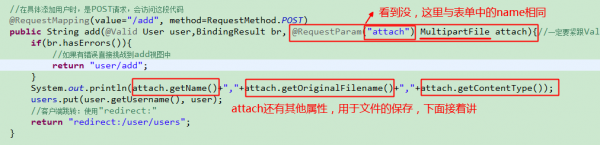

只是在控制臺打印了上傳文件的1些信息

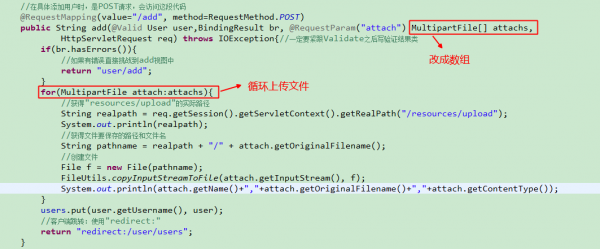
現(xiàn)在我們來實現(xiàn)真實的上傳文件
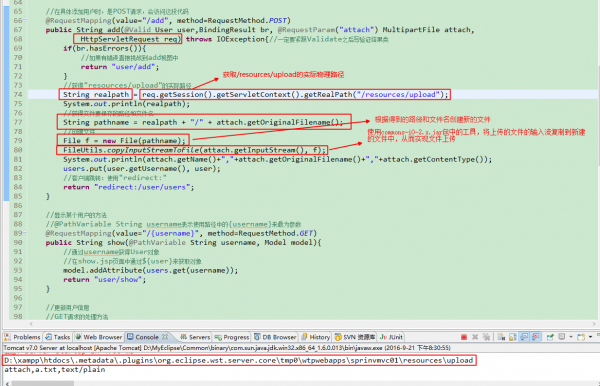
這個需要貼上代碼:
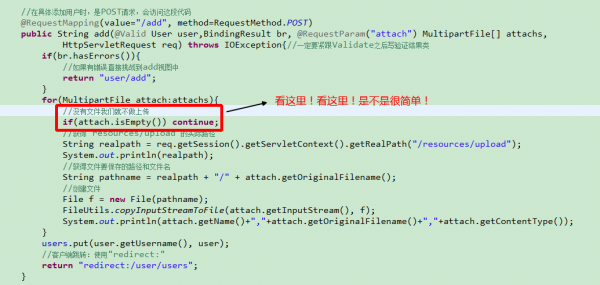
//在具體添加用戶時,是POST要求,會訪問這段代碼
@RequestMapping(value="/add", method=RequestMethod.POST)
public String add(@Valid User user,BindingResult br, @RequestParam("attach") MultipartFile attach,
HttpServletRequest req) throws IOException{//1定要緊跟Validate以后寫驗證結(jié)果類
if(br.hasErrors()){
//如果有毛病直接挑戰(zhàn)到add視圖中
return "user/add";
}
//取得"resources/upload"的實際路徑
String realpath = req.getSession().getServletContext().getRealPath("/resources/upload");
System.out.println(realpath);
//取得文件要保存的路徑和文件名
String pathname = realpath + "/" + attach.getOriginalFilename();
//創(chuàng)建文件
File f = new File(pathname);
FileUtils.copyInputStreamToFile(attach.getInputStream(), f);
System.out.println(attach.getName()+","+attach.getOriginalFilename()+","+attach.getContentType());
users.put(user.getUsername(), user);
//客戶端跳轉(zhuǎn):使用"redirect:"
return "redirect:/user/users";
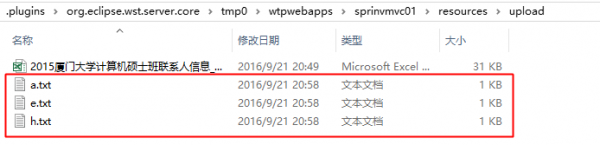
}上傳成功


上傳成功

但是,這里有1個問題需要特別注意
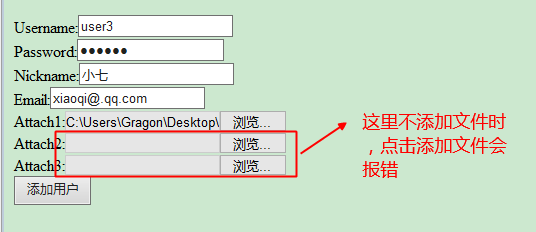

怎樣解決?很簡單,看下面
好了,文件上傳就講到這里就應(yīng)當(dāng)差不多了吧,呵呵。
終究講到這里了,真是要哭了,555555~~~

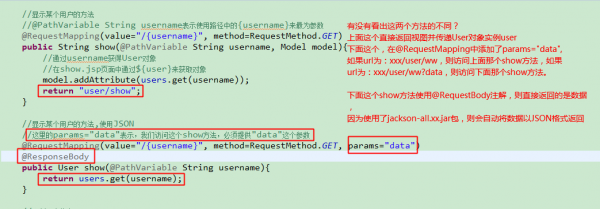
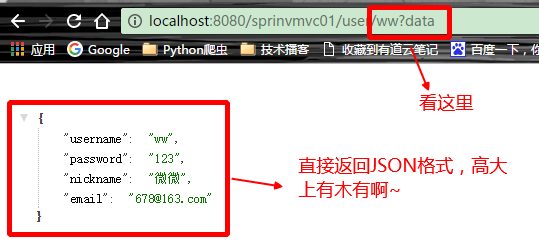
使用@RequestBody注解和jackson :
不使用它們:

程序員人生,我編程,我富裕,記住wfuyu網(wǎng),php教程,php學(xué)習(xí),php手冊,CMS模版制作
聲明:本站大部分內(nèi)容是作者原創(chuàng),少部分收集于互聯(lián)網(wǎng)供大家一起學(xué)習(xí),原版權(quán)很多不明,如有侵權(quán)請聯(lián)系本站,謝謝!
粵ICP備14040726號-1?? 2015-2020 程序員人生 版權(quán)所有