
接著上次的問題,已介紹過,在初始化或說OnCreate方法中獲得加載的布局的寬高,最后說到,調(diào)用view.measure(0, 0);然后在調(diào)用getMeasuredWidth和getMeasuredHeight就能夠取得丈量的寬高。可以參考:Android如何在初始化的時候獲得加載的布局的寬高
今天在寫類似的效果時,給ListView加載1個頭部視圖,通過listView$addHeadView添加到ListView的頭部。為了描寫起來簡單起見,這個頭部視圖的布局我做了簡化為下面:headview.xml
然后在初始化的時候想獲得該布局的寬高,就這樣做了:
結(jié)果。。。。。
程序崩潰了!尼瑪,不是說好的headView.measure(0, 0);調(diào)用完就可以獲得到布局的寬高了嘛,怎樣這句好報錯空指針異常了?
然后把布局修改成線性布局
居然就行了。。。

也獲得到了丈量的寬高:

接下來又開始了對問題的研究。為了簡化問題,還是依照上次的此路。在上次的基礎(chǔ)上添加布局viewgroup_relativelayout.xml,其實就是將外層的LinearLayout修改成RelativeLayout了,其他地方未變。加載該布局,然后丈量寬高。
<RelativeLayout xmlns:android="http://schemas.android.com/apk/res/android"
    xmlns:tools="http://schemas.android.com/tools"
    android:layout_width="match_parent"
    android:layout_height="match_parent"
     >
    <View
        android:layout_width="50dp"
        android:layout_height="50dp"
         />
</RelativeLayout>
看結(jié)果:
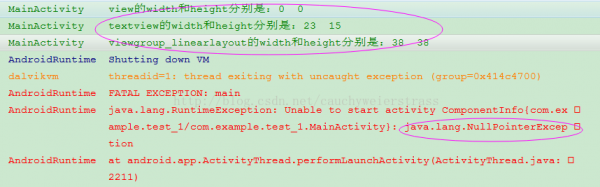
View,textview和線性布局的ViewGroup和上次的結(jié)果1樣。但是將相對布局的ViewGroup直接掛掉。。剛開始還是特別的不爽的,為何常常遇到問題,不過1想,解決問題的進(jìn)程就是水平提高的進(jìn)程,所以打起精神進(jìn)行研究。嘿嘿~
通過比較發(fā)現(xiàn)RelativeLayout出錯了,所以很容易將空指針異常的地方定位在RelativeLayout的onMeasure函數(shù)中。
但是這個函數(shù)比較復(fù)雜了。兩百多行代碼,里面牽扯了很多的域變量和函數(shù),讀起來挺累的。因此在網(wǎng)上搜了好久,在eoe上面看到有人說了下面的方法:
如果使用Inflater的情況下會出現(xiàn)以上毛病,緣由是用Inflater渲染組件的時候并沒有給其指定父控件,所以渲染器不會去解析width 和 height屬性,就會致使空指針異常。
解決方法:
view.setLayoutParams(newLayoutParams(LayoutParams.WRAP_CONTENT, LayoutParams.WRAP_CONTENT));指定寬度和高度,然后調(diào)用measure方法就OK。
其實這個說法前面就研究過,確切是這模樣的,但是LinearLayout為何沒出問題RelativeLayout就出問題了呢,所以還是沒有說明白緣由在哪里。
我嘗試了1下確切弄定了,緣由尚不清楚,那就肯定需要查源代碼了。在這個指點下給我提供了方向就是極可能在onMeasure方法里面調(diào)用了該相對布局的參數(shù)mLayoutParams,由于本來為null,那末調(diào)用的話就會報告空指針異常!
接下來就在源碼的onMeasure函數(shù)里面將所有出現(xiàn)mLayoutParams的地方打上斷點。然后斷點調(diào)試
RelativeLayou類(我查看的是4.2的源碼)
果然mLayoutParams變量不存在為null。
到現(xiàn)在為止問題就清楚了。由于調(diào)用headView.measure(0, 0);的時候是通過inflate(R.layout.headview, null);方式加載的布局,因此設(shè)置的外層RelativeLayout布局的LayoutParams是null的,恰巧相對布局沒有檢查是不是為null就直接調(diào)用了mLayoutParams.width或mLayoutParams.height,因此就報空指針毛病了。這多是1個bug吧我認(rèn)為。
既然知道了問題是出在了這里了,那末也很容易解決了。
最少有以下的解決方法:
1,加載布局的時候通過inflater.inflate(R.layout.viewgroup_relativelayout,(ViewGroup) findViewById(R.id.mainLayout),false);方式加載。這樣的話會設(shè)置他的布局參數(shù)。
2 手動設(shè)置布局參數(shù)添加上
現(xiàn)在再來看上1篇博客里面講的這個方法:
看起來貌似就是為了不外層布局是RelativeLayout的情況對LayoutParams做了判斷!但是直接調(diào)用上面這個方法依然不行,由于new出來的LayoutParams沒有設(shè)置進(jìn)去,所以還需要調(diào)用child.setLayoutParams(lp);然后就弄定了。經(jīng)過測試ok!
回到博客開始在ListView添加頭View所遇到的問題也就很容易解決了。
1,將相對布局換成線性布局。
2,依然使用相對布局,使用上面說的兩種方法設(shè)置外層的相對布局的布局參數(shù)。比如使用下面的方法,在家在布局的時候帶上父布局,結(jié)果弄定!好開心
將headView.measure(0, 0);換成measureView (headView);也能夠的。
但是加載布局的時候不帶上父布局,調(diào)用的是headView =inflater.inflate(R.layout.headview, null);即便用下面代碼:
程序居然又崩潰了。看調(diào)試結(jié)果:

不過不用擔(dān)心,這時候的毛病不是空指針了,而是類轉(zhuǎn)換異常,相信通錯誤誤很容易修改了
lp= new AbsListView.LayoutParams(AbsListView.LayoutParams.FILL_PARENT,AbsListView.LayoutParams.WRAP_CONTENT);
然后在運行就行了,大功告成。最后的忠告就是需要自己需要丈量布局寬高的時候慎用RelativeLayout,猶如解決ScrollView和ListView沖突的時候1種解決方法,這里我們只討論其中1個沖突就是:致使ListView的高度顯示不完全,出現(xiàn)只顯示部份內(nèi)容的情況。解決方法就是就是丈量ListView的總高度,然后設(shè)置1下,關(guān)鍵代碼以下。試想,如果這時候候如果各個item是RelativeLayout的話,肯定會出錯。
最后,這些東西可能有些人寫程序的時候都從沒遇到過,固然也不影響寫出漂亮的APP。但是我認(rèn)為不論是甚么問題,都能鍛煉解決問題的能力,都是有助于學(xué)習(xí)。
文字表達(dá)能力太差,表述能力是硬傷啊!
生活不易,碼農(nóng)辛苦
如果您覺得本網(wǎng)站對您的學(xué)習(xí)有所幫助,可以手機掃描二維碼進(jìn)行捐贈

上一篇 仿網(wǎng)易彩票思路
程序員人生,我編程,我富裕,記住wfuyu網(wǎng),php教程,php學(xué)習(xí),php手冊,CMS模版制作
聲明:本站大部分內(nèi)容是作者原創(chuàng),少部分收集于互聯(lián)網(wǎng)供大家一起學(xué)習(xí),原版權(quán)很多不明,如有侵權(quán)請聯(lián)系本站,謝謝!
粵ICP備14040726號-1?? 2015-2020 程序員人生 版權(quán)所有


