Android學習筆記二十二.使用ContentProvider實現數據共享(五).監聽ContentProvider的數據改變
來源:程序員人生 發布時間:2015-01-18 10:10:23 閱讀次數:3776次
1、使用ContentProvider管理多媒體內容
Android提供了Camera程序來支持拍照、拍攝視頻,用戶拍攝的相片、視頻都將寄存在固定的位置。Android一樣為這些多媒體內容提供了ContentProvider,所以我們可以通過使用ContentProvider實現其他利用直接訪問Camera所拍攝的照片、視頻等。
1.多媒體ContentProvider的Uri
(1)MediaStore.Audio.Media.EXTERNAL_CONTENT_URI:存儲在外部存儲器(SD卡)上的音頻文件內容的ContentProvider的Uri.
(2)MediaStore.Audio.Media.INTERNAL_CONTENT_URI:存儲在手機內部存儲器(SD卡)上的音頻文件內容的ContentProvider的Uri.
(3)MediaStore.Images.Media.EXTERNAL_CONTENT_URI:存儲在外部存儲器(SD卡)上的圖片文件內容的ContentProvider的Uri.
(4)MediaStore.Images.Media.INTERNAL_CONTENT_URI:存儲在手機內部存儲器(SD卡)上的圖片文件內容的ContentProvider的Uri.
(5)MediaStore.Video.Media.EXTERNAL_CONTENT_URI:存儲在外部存儲器(SD卡)上的視頻文件內容的ContentProvider的Uri.
(6)MediaStore.Video.Media.INTERNAL_CONTENT_URI:存儲在手機內部存儲器(SD卡)上的視頻文件內容的ContentProvider的Uri.
2.ContentResolve相干操作說明
(1)Uri ContentResolver.query(Uri uri, String[]
projection, String selection, String[] selectionArgs, String sortOrder)
功能:查詢給定URI對應的ContentProvider所暴露的數據中與selection相匹配的數據,并返回結果set集合的Cursor對象
參數:
uri :content:// scheme情勢的URI,用于獲得URI對應的ContentProvider;
projection:返回列表的其中列,當傳入值為null時則表示返回表中所有的列(效力低)
selection :聲明表中哪些行返回的過濾器,當傳入值為null時則表示返回給定URI數據的所有行
selectionArgs 通常為null
sortOrder 選擇如何實現所有行排序,當傳入值為null時為默許排序,便可能為無序
(2)Uri android.content.ContentResolver.insert(Uri url, ContentValues values)
功能:向URI對應的ContentProvider中插入values對應的數據(向表中插入1行數據)
參數:
url:插入表的URL
values :向給定的URI對應的數據表插入1個數據,為ContentValue對象對應的數據,傳遞1個空ContentValues將創建1個空行。
返回值:
the URL of the newly created row.
(3)delete(Uri uri,String where,String[] selectionArgs)
功能:刪除Uri對應的ContentProvider中where提交匹配的數據
(4)update(Uri uri,ContentValues values,String where,String selectionArgs)
功能:更新Uri對應的ContentProvider中where提交匹配的數據為values對應的數據
3.源碼分析
(1)查詢1張圖片并獲得其相應的信息
思路:首先,獲得URI對應ContentProvider的數據且為set集合。其次,順次獲得每張圖片的相干信息并存入相應的ArrayList表中。
ArrayList<String> names=new ArrayList<String>();
ArrayList<String> descs=new ArrayList<String>();
ArrayList<String> fileNames=new ArrayList<String>();
Cursor cursor = getContentResolver().query(Media.EXTERNAL_CONTENT_URI,null,null,null,null);
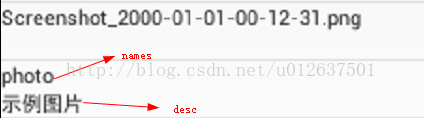
String name = cursor.getString(cursor.getColumnIndex(Media.DISPLAY_NAME)); //a.獲得圖片的顯示名
String desc = cursor.getString(cursor.getColumnIndex(Media.DESCRIPTION)); //b.獲得圖片的詳細描寫
byte[] data = cursor.getBlob(cursor.getColumnIndex(Media.DATA)); //c.獲得圖片的保存位置的數據
names.add(name); //d將圖片名、圖片描寫、圖片保存路徑分別添加到names、descs、fileNames集合中
descs.add(desc);
fileNames.add(new String(data,0,data.length⑴));
注意:這里是獲得Media.EXTERNAL_CONTENT_URI對應數據中的1張圖片信息,如果需要獲得所有set集合中的數據,則需要while(cursor.moveToNext())對集合中的所有圖片數據進行遍歷,然后順次將圖片的名稱、屬性、保存路徑分別添加到對應的ArrayList集合中。
(2)創建1個List集合,List集合的元素是Map,并將names、descs兩個集合對象的數據轉換到Map集合中;創建1個SimpleAdapter,并為show
ListView組件設置Adapter。
private ListView show;
List<Map<String,Object>> listItems = new ArrayList<Map<String,Object>>();
for(int i = 0; i<names.size() ;i++)
{
Map<String,Object> listItem = new HashMap<String,Object>(); //實例化1個HashMap對象
listItem.put("name", names.get(i)); //獲得列表中指定位置的元素,元素i的名稱
listItem.put("desc", descs.get(i)); //元素i的屬性
listItems.add(listItem);
}
SimpleAdapter simpleAdapter = new SimpleAdapter(
MediaProviderTest.this //上下文
,listItems //map集合數據
,R.layout.line //列表項布局
,new String[] {"name","desc"}//與每一個列表項相干列表中列名字,其被添加到Map集合中
,new int[] {R.id.name,R.id.desc});//對應與"from"列表的列組件,全部為TextView組件
show.setAdapter(simpleAdapter);
注釋:SimpleAdapter(Context context, List<? extends Map<String, ?>> data, int resource, String[] from, int[] to)
context:SimpleAdapter運行上下文
data :1個列表的Map集合,列表中的每一個條目對應于列表中的1行。Map集合包括每行的數據,并且應當包括“from”中所有指定的條目
resource :1個視圖布局的資源標識符,該布局文件最少包括了"to"中的組件,用于定義列表項的視圖;
from :A list of column names that will be added to the Map
associated with each item
to :The views that should display column in the "from" parameter.
These should all be TextViews. The first N views in this list are given the values of the first N columns in the from parameter.
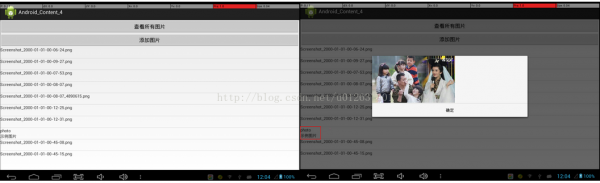
效果演示:
(3)創建1個對話框
a.加載View.xml界面布局代表的視圖
b.使用對話框顯示用戶單擊的圖片
View viewDialog=getLayoutInflater().inflate(R.layout.view, null);
new AlertDialog.Builder(MediaProviderTest.this)
.setView(viewDialog).setPositiveButton("肯定", null)
.show();
其中,R.layout.view為1個布局文件。
4.源碼
(1)MediaProviderTest.java
package com.example.android_content_4;
import java.io.IOException;
import java.io.OutputStream;
import java.util.ArrayList;
import java.util.HashMap;
import java.util.List;
import java.util.Map;
import android.app.Activity;
import android.app.AlertDialog;
import android.content.ContentValues;
import android.database.Cursor;
import android.graphics.Bitmap;
import android.graphics.BitmapFactory;
import android.net.Uri;
import android.os.Bundle;
import android.provider.MediaStore.Images.Media;
import android.view.View;
import android.view.View.OnClickListener;
import android.widget.AdapterView;
import android.widget.AdapterView.OnItemClickListener;
import android.widget.Button;
import android.widget.ImageView;
import android.widget.ListView;
import android.widget.SimpleAdapter;
public class MediaProviderTest extends Activity {
private Button catBtn,addBtn;
private ListView show;
ArrayList<String> names=new ArrayList<String>();
ArrayList<String> descs=new ArrayList<String>();
ArrayList<String> fileNames=new ArrayList<String>();
@Override
protected void onCreate(Bundle savedInstanceState) {
super.onCreate(savedInstanceState);
setContentView(R.layout.main);
catBtn=(Button)findViewById(R.id.cat);
addBtn=(Button)findViewById(R.id.add);
show=(ListView)findViewById(R.id.list);
catBtn.setOnClickListener(new OnClickListener(){
@Override
public void onClick(View v) {
names.clear();
descs.clear();
fileNames.clear();
//1.通過ContentResolver查詢所有圖片信息
Cursor cursor = getContentResolver().query(Media.EXTERNAL_CONTENT_URI,null,null,null,null);
while(cursor.moveToNext())
{
//a.獲得圖片的顯示名
String name = cursor.getString(cursor.getColumnIndex(Media.DISPLAY_NAME));
//b.獲得圖片的詳細描寫
String desc = cursor.getString(cursor.getColumnIndex(Media.DESCRIPTION));
//c.獲得圖片的保存位置的數據
byte[] data = cursor.getBlob(cursor.getColumnIndex(Media.DATA));
//d.將圖片名、圖片描寫、圖片保存路徑分別添加到names、descs、fileNames集合中
names.add(name);
descs.add(desc);
fileNames.add(new String(data,0,data.length⑴));
}
//2.創建1個List集合,List集合的元素是Map,并將names、descs兩個集合對象的數據轉換到Map集合中
List<Map<String,Object>> listItems = new ArrayList<Map<String,Object>>();
for(int i = 0; i<names.size() ;i++)
{
Map<String,Object> listItem = new HashMap<String,Object>();
listItem.put("name", names.get(i)); //獲得列表中指定位置的元素,元素i的名稱
listItem.put("desc", descs.get(i)); //元素i的屬性
listItems.add(listItem);
}
//3.創建1個SimpleAdapter,并為show ListView組件設置Adapter
SimpleAdapter simpleAdapter = new SimpleAdapter(
MediaProviderTest.this,listItems
,R.layout.line
,new String[] {"name","desc"}
,new int[] {R.id.name,R.id.desc});
show.setAdapter(simpleAdapter);
}
});
//4.為show ListView的列表項單擊事件添加監聽器
show.setOnItemClickListener(new OnItemClickListener(){
@Override
public void onItemClick(AdapterView<?> parent, View view,
int position, long id) {
//a.加載View.xml界面布局代表的視圖
View viewDialog=getLayoutInflater().inflate(R.layout.view, null);
//b.獲得viewDialog中Id為image的組件
ImageView image=(ImageView)viewDialog.findViewById(R.id.image);
//c.設置image顯示指定圖片
image.setImageBitmap(BitmapFactory.decodeFile(fileNames.get(position)));
//d.使用對話框顯示用戶單擊的圖片
new AlertDialog.Builder(MediaProviderTest.this)
.setView(viewDialog).setPositiveButton("肯定", null)
.show();
}
});
//5.為add按鈕的單擊事件綁定監聽器
addBtn.setOnClickListener(new OnClickListener(){
@Override
public void onClick(View v) {
//a.創建ContentValues對象,準備插入數據
ContentValues values = new ContentValues();
values.put(Media.DISPLAY_NAME, "photo");
values.put(Media.DESCRIPTION, "示例圖片");
values.put(Media.MIME_TYPE, "image/jpeg");
//b.插入數據,返回所插入數據對應的Uri
Uri uri = getContentResolver().insert(Media.EXTERNAL_CONTENT_URI, values);
//c.加載利用程序下photo圖片
Bitmap bitmap=BitmapFactory.decodeResource(MediaProviderTest.this.getResources(),R.drawable.photo);
OutputStream os = null;
try{
os=getContentResolver().openOutputStream(uri);
bitmap.compress(Bitmap.CompressFormat.JPEG, 100, os);
os.close();
}catch(IOException e)
{
e.printStackTrace();
}
}
});
}
}
(2)主Activity布局文件/res/layout/main.xml
<LinearLayout xmlns:android="http://schemas.android.com/apk/res/android"
android:layout_width="wrap_content"
android:layout_height="wrap_content"
android:orientation="vertical" >
<Button
android:id="@+id/cat"
android:layout_width="match_parent"
android:layout_height="wrap_content"
android:text="查看所有圖片"/>
<Button
android:id="@+id/add"
android:layout_width="match_parent"
android:layout_height="wrap_content"
android:text="添加圖片"/>
<ListView
android:id="@+id/list"
android:layout_width="match_parent"
android:layout_height="wrap_content"></ListView>
</LinearLayout>
(3)列表項布局/res/layout/line.xml
<?xml version="1.0" encoding="utf⑻"?><LinearLayout xmlns:android="http://schemas.android.com/apk/res/android"
android:layout_width="match_parent"
android:layout_height="match_parent"
android:orientation="vertical" >
<TextView
android:id="@+id/name"
android:layout_width="match_parent"
android:layout_height="wrap_content"/>
<TextView
android:id="@+id/desc"
android:layout_width="match_parent"
android:layout_height="wrap_content"/>
</LinearLayout>
(4)點擊列表項,彈出對話框布局/res/layout/view.xml
<?xml version="1.0" encoding="utf⑻"?>
<LinearLayout xmlns:android="http://schemas.android.com/apk/res/android"
android:layout_width="match_parent"
android:layout_height="match_parent"
android:orientation="vertical" >
<ImageView
android:id="@+id/image"
android:layout_width="wrap_content"
android:layout_height="wrap_content"/>
</LinearLayout>
(5)效果演示
2、監聽ContentProvider的數據改變
1.ContentObserver
(1)功能:幫助利用程序實現實時監聽ContentProvider所同享的數據是不是改變,并隨著ContentProvider的數據的改變而提供響。為了監聽指定的ContentProvider的數據變化,我們通過ContentResolver向指定Uri注冊ContentObserver監聽器。
(2)重要方法
registerContentObserver(Uri uri,boolean notifyForDescendents,ContentObserver observer)
作用:向指定Uri注冊ContentObserver監聽器
參數:
uri:該監聽器所監聽的ContentProvider的Uri;
notifyForDescendents:設置為true,假定注冊監聽的Uri為content://abc,那末Uri為content://abc/xyz、content://abc/xyz/foo的數據改變時也會觸發該監聽器;若為false只有content://abc數據改變時才會觸發該監聽器;
2.開發思路
(1)通過ContentResolver向指定的Uri注冊ContentObserver監聽器(監聽器類 SmsObserver),以便監聽Uri對應的ContentProvider的數據變化;
getContentResolver().registerContentObserver(Uri.parse("content://sms"),true,new
SmsObserver(new Handler()));
其中,new SmsObserver(new Handler())為繼承于ContentObserver子類對象,參數為Handler對象
(2)實現監聽器類 SmsObserver。該監聽器類 繼承于ContentObserver類,并重寫該基類所定義的onChange(boolean
selfChange)方法-----當它所監聽的ContentProvider的數據產生改變時,該onChange將會被觸發。
3.源碼實例
package com.example.android_content_5;
import android.app.Activity;
import android.database.ContentObserver;
import android.database.Cursor;
import android.net.Uri;
import android.os.Bundle;
import android.os.Handler;
import android.widget.TextView;
public class MonitorSms extends Activity {
private TextView sms;
@Override
protected void onCreate(Bundle savedInstanceState) {
super.onCreate(savedInstanceState);
setContentView(R.layout.main);
sms=(TextView)findViewById(R.id.message);
//1.為content://sms的數據改變注冊監聽器
getContentResolver().registerContentObserver(Uri.parse("content://sms"),true, new SmsObserver(new Handler()));
}
//2.提供自定義的ContentObserver監聽器類
private final class SmsObserver extends ContentObserver
{
//a.構造方法
public SmsObserver(Handler handler)
{
super(handler);
}
public void onChange(boolean selfChange)
{
//b.查詢發送箱中的短信(處于正在發送狀態的信息放在發送箱),即查詢content://sms/outbox的全部數據
Cursor cursor = getContentResolver().query(Uri.parse("content://sms/outbox"), null, null, null, null);
while(cursor.moveToNext())
{
StringBuilder sb = new StringBuilder();
//獲得短信的發送地址
sb.append("address=").append(cursor.getString(cursor.getColumnIndex("address")));
//獲得短信的標題
sb.append(";subject=").append(cursor.getString(cursor.getColumnIndex("subject")));
//獲得短信的內容
sb.append(";body=").append(cursor.getString(cursor.getColumnIndex("body")));
//獲得短信的發送時間
sb.append(";time=").append(cursor.getLong(cursor.getColumnIndex("date")));
System.out.println("Has Sent SMS::"+sb.toString());
}
}
}
}
注釋:Handler類
A Handler allows you to send and process Message and Runnable
objects associated with a thread's MessageQueue. Each Handler instance is associated with a single thread and that thread's message queue. When you create a new Handler, it is bound to the thread / message queue of the thread that is creating it -- from that
point on, it will deliver messages and runnables to that message queue and execute them as they come out of the message queue.
生活不易,碼農辛苦
如果您覺得本網站對您的學習有所幫助,可以手機掃描二維碼進行捐贈