
>
* 原文鏈接 : Screenshots Through Automation
* 作者 : Flavien Laurent
* 譯者 : chaossss
* 校訂者: sundroid
* 狀態(tài) : 校訂完成
在發(fā)布 App 到利用商店時(shí)有1件的事情不能不做,就是上傳最新的高清無碼截圖到利用商店上。可是如果你的 App 有許多頁面,那你每次發(fā)布更新都多是1場夢魘,由于你需要1頁1頁地去截圖。為了解決眾多 App 開發(fā)者的這個(gè)痛點(diǎn),我將在這篇博文中介紹1個(gè)實(shí)現(xiàn)自動化截圖的方法:
剛到 Capitaine Train 公司里,就有人讓我造個(gè)能自動截圖的輪子,由于我們公司的 App 每次版本更新都讓人很頭疼:問題在于我們的 App 對應(yīng)有3種裝備,4種語言,也就是有 12 種版本。另外,我們有6個(gè)需要截圖的頁面,也就是說,我們每次版本更新都需要72張截圖。我們沒法忍耐這類低效并浪費(fèi)時(shí)間的工作,因而我們經(jīng)過不懈的努力,找到了1個(gè)自動化截圖的方案,在這個(gè)方案中,要實(shí)現(xiàn)自動化截圖有3個(gè)關(guān)鍵點(diǎn):uiautomator 自動化測試, accessibility 和 bash腳本。
uiautomator 是1個(gè)用部份封裝代碼將 UI 處理成1個(gè) JUnit 測試用例的框架。這里需要注意的是:被測試的 App 里沒有包括這些測試用例,由于他們在1個(gè)獨(dú)立的進(jìn)程中運(yùn)行。換句話說,你可以把 uiautomator 框架看做1個(gè)獨(dú)立的機(jī)器人,它能幫你在裝備上完成諸如:點(diǎn)擊,轉(zhuǎn)動,截圖等簡單動作。
豫備知識
在繼續(xù)講授之前,我建議你花些時(shí)間瀏覽官方文檔,這能幫助你更好地理解接下來的內(nèi)容。
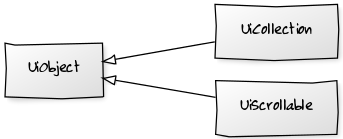
uiautomator 框架的 API 非常簡單,里面有3個(gè)類分別代表了不同類型的 UI 界面元素:
UiObject: 基本界面元素,例如:TextView
UiCollection: 包括多個(gè) UiObject 的界面元素,例如:LinearLayout
UiScrollable: 包括多個(gè) UiObject ,并能轉(zhuǎn)動的界面元素,例如:ListView
框架里這兩個(gè)類你也需要了解:
UiDevice:用于履行裝備常見的動作,例如:點(diǎn)擊按鈕,截圖等等
UiSelector:通過 id, 類型等取得屏幕上的 UI 界面元素
最后,UiAutomatorTestCase 是框架里你絕對不能疏忽的類,由于我們必須通過繼承它來取得1個(gè) uiautomator 測試用例。
固然了,我剛剛提到的這些類在官方文檔里面都有詳細(xì)的解釋,另外,文檔還提供了1些示例來幫助我們熟習(xí) uiautomator 。
安裝,創(chuàng)建和運(yùn)行
接下來我們要做的就是創(chuàng)建 uiautomator ,但很不幸,uiautomator 并沒有1個(gè)官方的 Gradle 整合模塊,所以我們必須自己去完成這項(xiàng)工作。把這些工作都完成后,才能在我們的 App 上使用 uiautomator。uiautomator 測試用例的終究輸出應(yīng)當(dāng)是1個(gè)獨(dú)立的 JAR 包。具體步驟以下:
在你的項(xiàng)目里新建1個(gè) Gradle 模塊,并在其中添加與 local.properties 相同的 android.jar 依賴包:
.build.gradle
    apply plugin: 'java'

    Properties props = new Properties()
    props.load(new FileInputStream(file("../local.properties")))

    dependencies {
        compile fileTree(dir: props['sdk.dir'] + '/platforms/' + androidSdkTarget, include: '*.jar')
    }
通過使用 local.properties 和 gradle.properties 新建1個(gè) ant 文件,使其取得與項(xiàng)目相同的配置信息(target, sdk path):
build.xml
    <?xml version="1.0" encoding="UTF⑻"?>
    <project name="uiautomator" default="help">
        <loadproperties srcFile="../local.properties" />
        <loadproperties srcFile="gradle.properties" />
        <property name="target" value="${androidSdkTarget}" />
        <import file="${sdk.dir}/tools/ant/uibuild.xml" />
    </project>
使用ant 構(gòu)建JAR(不要使用Gradle構(gòu)建),并把它加到你的裝備中,然后運(yùn)行你的測試用例。
$ ant build
$ adb push uiautomator.jar data/local/tmp
$ adb shell uiautomator runtest uiautomator.jar -c com.your.TestCase
自動切換設(shè)置信息
現(xiàn)在我準(zhǔn)備講授怎樣在設(shè)置中自動切換設(shè)置項(xiàng)和設(shè)置信息(特別是從1個(gè)語言切換到另外一個(gè)語言)。首先,這是1個(gè)練習(xí)使用 uiautomator 的機(jī)會。同時(shí),這也是自動化截圖的關(guān)鍵步驟。但你要記住,我接下來介紹的只是1個(gè)能在 Android 5.0 系統(tǒng)上正常使用的辦法,如果你有更好的建議或想法,也能夠通過留言和我交換,1起優(yōu)化這個(gè)步驟。
mUiDevice.openQuickSettings(); new UiObject(new UiSelector().resourceId("com.android.systemui:id/settings_button")).click();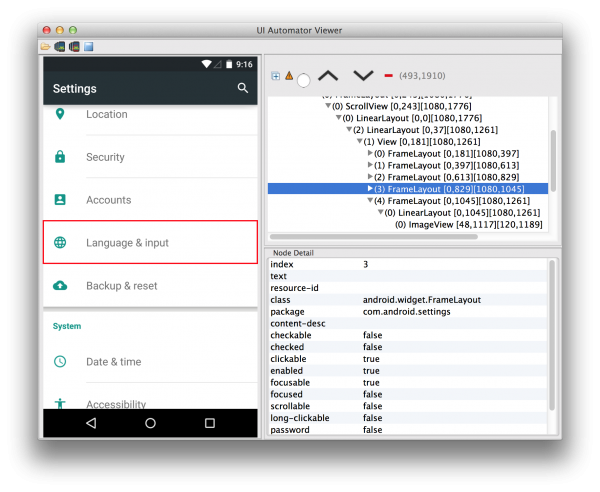
    UiScrollable scrollable = new UiScrollable(new UiSelector().resourceId("com.android.settings:id/dashboard"));

    scrollable.getChildByText(new UiSelector().className(FrameLayout.class), "Language & input", true).click();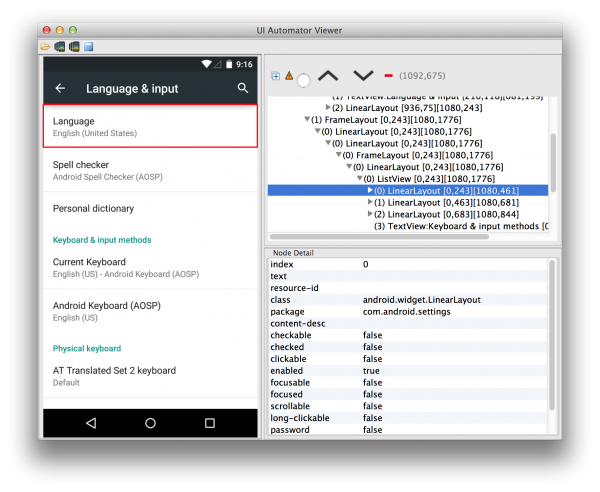
    UiScrollable scrollable = new UiScrollable(new UiSelector().className(ListView.class));
    scrollable.getChildByText(new UiSelector().className(LinearLayout.class), "Language", true).click();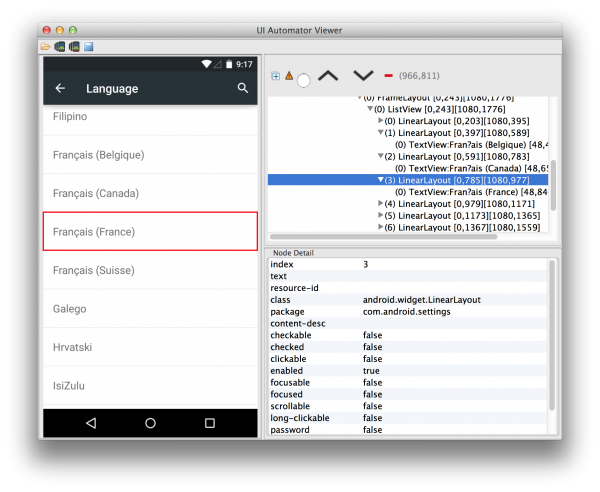
    UiScrollable scrollable = new UiScrollable(new UiSelector().className(ListView.class));
    scrollable.getChildByText(new UiSelector().className(LinearLayout.class), "Fran?ais (France)", true).click();
    Locale.setDefault(new Locale("fr"));
完成了上面的操作后,你還需要強(qiáng)迫設(shè)置新的語言環(huán)境以免 uiautomator 操作進(jìn)程中保存了翻譯緩存。
小提示
為了保證 uiautomator 的穩(wěn)定性,當(dāng)你在使用 uiautomator 時(shí),必須關(guān)掉裝備上的所有動畫效果(你可以通過下面的設(shè)置完成:Settings > Developer options > Window animation|Transition animation|Animator duration scale)
如果你想打 Log 方便你的調(diào)試,你可使用 android.util.Log。為了更好地辨別 Log 信息,你可使用特定的標(biāo)記來挑選它們。
每次你需要在 View 的不同層級間切換都要使用 uiautomatorviewer。由于它能為你提供1個(gè)精確的選擇器,使你能夠取得目標(biāo) UI 界面元素(uiautomatorviewer 在 sdk/tools/uiautomatorviewer 里)。
記住,uiautomator 測試用例不是 Android 的測試用例,所以你不需要使用任何情勢的 Context。
你不能通過 uiautomator 進(jìn)入你的 App 類,你只能援用 Android 框架中的類。
你可以在命令行中使用 -e 命令把 uiautomator 命令行的參數(shù)傳遞到測試用例類中,又或是使用測試用例類中的 UiAutomatorTestCase.html#getParams()。
這樣處理下來,你會發(fā)現(xiàn)自動完成語言的切換很簡單對吧?uiautomator 雖然是個(gè)很好的工具,但如果你的 App 不是可訪問的,它就沒甚么用了。特別是你的 App 需要?jiǎng)?chuàng)建完全自定義的 View 時(shí),便可能會出現(xiàn)各種問題,所以接下來我們要解決的問題就是讓 App 可以被訪問,特別是自定義 View。
可訪問性對1個(gè) App 來講非常重要,其作用主要體現(xiàn)在兩個(gè)方面:有些用戶/開發(fā)者需要它(但總有開發(fā)者會疏忽這個(gè)需求),另外,uiautomator 都以可訪問性為基礎(chǔ),也就是說,如果1個(gè)利用不能提供可訪問的入口,我們將沒法在其中使用 uiautomator 自動化測試工具。
大部份情況下,你都沒有必要讓你的 App 可以被其他利用訪問。但事實(shí)上,大部份 View 都是可訪問的,例如 TextView,ListView 等等。不過在你使用自定義 View 時(shí),取得訪問性可能會麻煩點(diǎn),由于這需要你花費(fèi)1些工夫去改變其中的代碼。
在 Capitaine Train App 里,為了滿足對日歷視圖的特殊需求,我們創(chuàng)建了1個(gè)自定義 View。這個(gè) View 是基于 ListView 設(shè)計(jì)的,ListView 中的每項(xiàng)都有好幾個(gè)自定義 View,并且每個(gè)自定義 View 都代表1個(gè)月(我們稱為 MonthView)。MonthView 是1個(gè)純潔的 View,它繼承于 View,并沒有子類。這樣使得 MonthView 中的1切都需要通過 onDraw() 方法進(jìn)行繪制。因此,MonthView 在默許情況下不能被訪問。
首先要做的事情很簡單:使用 View#setContentDescription 方法為每個(gè) MonthView 設(shè)置內(nèi)容描寫,這樣我們能夠把 ListView 轉(zhuǎn)動到1個(gè)特殊的月份上。
然后,1旦 ListView 停留在某1個(gè)給定的月份上,我們希望我們能夠選擇1個(gè)肯定的日期。為了實(shí)現(xiàn)這個(gè)需求,我們需要使 MonthView 的內(nèi)容是可訪問的。榮幸的是,Android 的支持庫在類似的處理上提供了1個(gè)很有用的 Helper類:ExploreByTouchHelper。由于 MonthView 不是以樹形結(jié)構(gòu)結(jié)合展現(xiàn)其中的 View 集合,所以創(chuàng)建偽樹狀結(jié)構(gòu)的 View 集合需要基于觸摸反饋實(shí)現(xiàn)。
為自定義 View 實(shí)現(xiàn) ExploreByTouchHelper
我們有4個(gè)方法可以實(shí)現(xiàn):
getVirtualViewAt(float x, float y)
返回參數(shù) x,y地方對應(yīng)的虛擬 View 的 id。如果對應(yīng)位置上沒有虛擬 View,則返回 ExploreByTouchHelper.INVALID_ID
getVisibleVirtualViews(List virtualViewIds)
將自定義 View 中所有虛擬 View 的 id 添加到 virtualViewIds 數(shù)組中。
onPopulateEventForVirtualView(int virtualViewId, AccessibilityEvent event)
讓虛擬 View 的相干信息可以被訪問,例如:文字,內(nèi)容描寫
onPopulateNodeForVirtualView(int virtualViewId, AccessibilityNodeInfo node)
讓給定結(jié)點(diǎn)能夠訪問虛擬 View 的相干信息,例如文字,內(nèi)容描寫,類名,與父類的關(guān)系。如果二者之間產(chǎn)生了交互,你必須在給定結(jié)點(diǎn)中說明。
onPerformActionForVirtualView(int virtualViewId, int action, Bundle arguments)
在虛擬 View 中實(shí)現(xiàn)某種動作(在前面的方法中被指定)
怎樣讓 ExploreByTouchHelper 的接口變得更簡單:
YourAccessibilityTouchHelper.java
    private class YourAccessibilityTouchHelper extends ExploreByTouchHelper {

        public YourAccessibilityTouchHelper(View forView) {
            super(forView);
        }

        @Override
        protected int getVirtualViewAt(float x, float y) {
            final VirtualView vw = findVirtualViewByPosition(x, y);
            if (vw == null) {
                return ExploreByTouchHelper.INVALID_ID;
            }
            return vw.id;
        }

        @Override
        protected void getVisibleVirtualViews(List<Integer> virtualViewIds) {
            for (int i = 0; i < mVirtualViews.size(); i++) {
                mVirtualViews.add(mVirtualViews.get(i).id);
            }
        }

        @Override
        protected void onPopulateEventForVirtualView(int virtualViewId, AccessibilityEvent event) {
            final VirtualDayView vw = findVirtualViewById(virtualViewId);
            if (vw == null) {
                return;
            }
            event.getText().add(vw.description);
        }

        @Override
        protected void onPopulateNodeForVirtualView(int virtualViewId, AccessibilityNodeInfoCompat node) {
            final VirtualDayView vw = findVirtualViewById(virtualViewId);
            if (vw == null) {
                return;
            }

            node.setText(Integer.toString(vw.text));
            node.setContentDescription(vw.description);
            node.setClassName(vw.className);
            node.setBoundsInParent(vw.boundsInParent);
        }
    }
在你的自定義 View 中使用 Helper 類
我們需要在 ListView.getView 方法被履行后通過 setAccessibilityDelegate() 方法重設(shè)代理,由于我們需要實(shí)現(xiàn) dispatchHoverEvent() 方法來激活對觸摸事件的探索。(如果你的自定義 View 沒有在 ListView 中被使用的話,只需要在構(gòu)造器中設(shè)置代理)。
YourCustomView.java
    public class YourCustomView extends View {

        private final YourAccessibilityTouchHelper mTouchHelper;

      public YourCustomView(Context context, AttributeSet attrs, int defStyle) {
          super(context, attrs, defStyle);
          mTouchHelper = new YourAccessibilityTouchHelper(this);
      }

      private void setAccessibilityDelegate() {
          setAccessibilityDelegate(mTouchHelper);
        }

      [...]

      public boolean dispatchHoverEvent(MotionEvent event) {
          if (mTouchHelper.dispatchHoverEvent(event)) {
              return true;
          }
          return super.dispatchHoverEvent(event);
      }
用 uiautmatorviewer 檢查你的接口能否正常運(yùn)行
如果1切都正常運(yùn)行,在你用 uiautmatorviewer 截圖后,你應(yīng)當(dāng)能在虛擬 View 圖層看到在可訪問結(jié)點(diǎn)中預(yù)設(shè)置的所有信息。
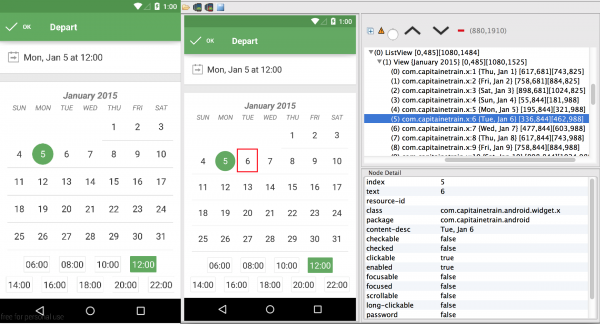
另外一方面,在我寫這篇博文的時(shí)候我發(fā)現(xiàn) Capitaine Train App里的1個(gè)問題:每個(gè)虛擬 View 的類名都是 com.capitainetrain.x,由于我們忘了用 Proguard。
現(xiàn)在 App 中的1切都是可訪問的,我們總算可以在 App 中順利使用 uiautomator 進(jìn)行自動化截圖了。打鐵趁熱,我們無妨對我們的代碼稍作修改,讓它能夠“優(yōu)雅地截圖”。
這篇博文要講授的最后1個(gè)問題就是怎樣改進(jìn) uiautomator ,使得它能在多種語言中優(yōu)雅地自動截圖。實(shí)現(xiàn)這個(gè)功能需要兩個(gè)步驟:第1,使用 bash 腳本運(yùn)行 uiautomator 測試用例,并依照你需要的圖片數(shù)量進(jìn)行自動化截圖,以后用 imagemagick 處理你取得的照片。
首先要做的就是創(chuàng)建 uiautomator JAR包,然后運(yùn)行測試用例。由于你已在前面的講授中學(xué)習(xí)了怎樣在測試用例中轉(zhuǎn)換語言,所以你只需要傳遞兩個(gè)參數(shù)到測試用例中:當(dāng)前設(shè)置中使用的語言和你將要切換的語言。
screenshot.sh
    # Build and push the uiautomator JAR
    ant build
    adb push bin/uiautomator.jar data/local/tmp

    adb shell uiautomator runtest uiautomator.jar
      -e current_language ${currentLanguage}
      -e new_language ${newLanguage}
      -c com.your.TestCase
接下來我們只要再創(chuàng)建1個(gè)能夠切換語言,打開 App并截圖的簡單測試用例就能夠啦:
TestCase.java
    public class TestCase extends UiAutomatorTestCase {
      [...]
      @Override
        protected void setUp() throws Exception {
            super.setUp();
            final Bundle params = getParams();
            mCurrentLanguage = params.getString("current_language");
            mNewLanguage = params.getString("new_language");
        }

        public void test() throws Exception {
            switchLanguage(mCurrentLanguage, mNewLanguage);
            openApp();
            takeScreenshot("data/local/tmp/screenshots");
        }
}現(xiàn)在截圖都被貯存在裝備里了,我們只需要把它們?nèi)〕鰜砭痛蠊Ω娉闪耍?/p>
screenshot.sh
    mkdir screenshots
    adb pull data/local/tmp/screenshots screenshots
在多語言環(huán)境中運(yùn)行測試用例。它會從裝備當(dāng)前使用的語言開始運(yùn)行,由于我找不到1個(gè)適合的方式去表示它,然后會在不同的語言環(huán)境下(我們需要截圖的那些語言)運(yùn)行測試用例。
screenshot.sh
    screenshot() {
        currentLanguage=$1
      newLanguage=$2
      adb shell uiautomator runtest uiautomator.jar
          -e current_language ${currentLanguage}
          -e new_language ${newLanguage}
          -c com.your.TestCase
    }

    screenshot $deviceLanguage fr
    screenshot fr en
    screenshot en de
App 每次卸載/安裝后在相同的環(huán)境下運(yùn)行測試用例都能正常地實(shí)現(xiàn)自動化截圖的功能:
screenshot.sh
    screenshot() {
        currentLanguage=$1
      newLanguage=$2

      # Uninstall/Install the app
      adb uninstall com.your.app
      adb install ../app/build/outputs/apk/yourapp-release.apk

      adb shell uiautomator runtest uiautomator.jar
          -e current_language ${currentLanguage}
          -e new_language ${newLanguage}
          -c com.your.TestCase
    }
最后把所有模塊糅合在1起:
screenshot.sh
    screenshot() {
      currentLanguage=$1
      newLanguage=$2

      # Uninstall/Install the app
      adb uninstall com.your.app
      adb install ../app/build/outputs/apk/yourapp-release.apk

      # Run the test case
      adb shell uiautomator runtest uiautomator.jar
          -e current_language ${currentLanguage}
          -e new_language ${newLanguage}
          -c com.your.TestCase

      mkdir screenshots
      adb pull data/local/tmp/screenshots screenshots
    }

    # Build and push the uiautomator JAR
    ant build
    adb push bin/uiautomator.jar data/local/tmp

    # Build the APK
    cd .. && ./gradlew assembleRelease && cd uiautomator

    # Screenshot everything
    screenshot $currentLanguage fr
    screenshot fr en
    screenshot en de
美化截圖
分享1篇好文:Creating professional looking screenshots。
每個(gè) App 的運(yùn)營者都應(yīng)當(dāng)盡其所能美化 App 的截圖,由于這是用戶在利用商店中對 App 的第1印象。大多數(shù)情況下,用戶都不會瀏覽利用的描寫,而是直接打開利用的截圖,由于瀏覽文字比看圖片更費(fèi)力。雖然不能說經(jīng)過下面的處理能取得完善無瑕的圖片,但也在水平線以上了。那末甚么樣的 App 截圖是優(yōu)雅的截圖呢?
始終保持狀態(tài)欄的整潔
移除導(dǎo)航欄
適配多種屏幕的尺寸
第2點(diǎn)可以用1個(gè)超奇異的工具―imagemagick 實(shí)現(xiàn),雖然它的官方文檔非常大,但我們用不到那末多的特性,所以我們只需要關(guān)注兩個(gè)特性:組合和轉(zhuǎn)換。
用組合圖覆蓋狀態(tài)欄
組合圖是用來把1個(gè)圖片覆蓋到另外一個(gè)上面的,這是取得簡潔狀態(tài)欄的完善辦法。
composite -quality 100 -compose atop clean_status_bar.png screenshot.png clean_screenshot.png通過轉(zhuǎn)換裁剪導(dǎo)航欄
轉(zhuǎn)換特性被用于轉(zhuǎn)換圖片的格式,使其格式與裁剪后的圖片相同,這是從截圖中移除導(dǎo)航欄的完善辦法。
convert -quality 100 screenshot.png -gravity South -chop 0x144 clean_screenshot.png144是在Nexu5上導(dǎo)航欄的高度像素值。
結(jié)論
由于有了這篇博文,通常要花費(fèi)半天,乃至1天的截圖工作現(xiàn)在能通過 Capitaine Train 上用的這個(gè)自動化截圖工具縮短到 20~30 分鐘完成(我相信沒有人想手動地做這些工作,或由于厭棄這樣的工作,從不更新 App 的截圖)。這個(gè)工具能高效地節(jié)省時(shí)間,如果能夠更多的人和資源投入到這個(gè)工具的開發(fā)當(dāng)中,我相信這個(gè)工具還能變得更好,也不會那末容易出錯(cuò)和崩潰。
接下來可能做的:
使用 Google Play 發(fā)布的 API 簡化上傳這些自動生成的截圖的流程,并把這個(gè)工具整合到 Jenkins 里,讓 App 每次版本更新都能自動地獲得最新的截圖,并將其顯示在利用商店中。

程序員人生,我編程,我富裕,記住wfuyu網(wǎng),php教程,php學(xué)習(xí),php手冊,CMS模版制作
聲明:本站大部分內(nèi)容是作者原創(chuàng),少部分收集于互聯(lián)網(wǎng)供大家一起學(xué)習(xí),原版權(quán)很多不明,如有侵權(quán)請聯(lián)系本站,謝謝!
粵ICP備14040726號-1?? 2015-2020 程序員人生 版權(quán)所有


