
Nginx源碼實現有1個很好的優點就是模塊化,有點像面向對象語言的設計模式,實現“高內聚,松耦合”,這篇博客主要講授模塊的共有流程
集中在ngx_cycle.c、 ngx_process.c、 ngx_process_cycle.c 和 ngx_event.c代碼中。共有流程開始于解析 nginx 配置,這個進程集中在 ngx_init_cycle 函數中。 ngx_init_cycle 是 nginx 的1個核心函數,共有流程中與配置相干的幾個進程都在這個函數中實現,其中包括解析 nginx 配置、初始化 CORE模塊,接著是初始化文件句柄,初始化毛病日志,初始化同享內存,然后是監聽端口。可以說共有流程 80% 都是現在 ngx_init_cycle 函數中,其中流程可以參考 3:深入理解Nginx的模塊化 (結合源碼詳解)
Nginx框架都是圍繞著ngx_cycle_t結構體控制進程運行的,ngx_cycle_t結構體初始化就是在ngx_init_cycle函數中。
truct ngx_cycle_s {
/* 保存著所有模塊存儲配置項的結構體指針, 它首先是1個數組,數組大小為ngx_max_module,正好與Nginx的module個數1樣;
每一個數組成員又是1個指針,指向另外一個存儲著指針的數組,因此會看到void ****
每一個進程中都有1個唯1的ngx_cycle_t核心結構體,它有1個成員conf_ctx保護著所有模塊的配置結構體,
其類型是void ****conf_ctx。conf_ctx意義為首先指向1個成員皆為指針的數組,其中每一個成員指針又指向另外1個
成員皆為指針的數組,第2個子數組中的成員指針才會指向各模塊生成的配置結構體。這正是為了事件模
塊、http模塊、mail模塊而設計的,這有益于不同于NGX_CORE_MODULE類型的
特定模塊解析配置項。但是,NGX_CORE_MODULE類型的核心模塊解析配置項時,配置項1定是全局的,
不會從屬于任何{}配置塊的,它不需要上述這類雙數組設計。解析標識為NGX_DIRECT_CONF類型的配
置項時,會把void****類型的conf_ctx強迫轉換為void**,也就是說,此時,在conf_ctx指向的指針數組
中,每一個成員指針不再指向其他數組,直接指向核心模塊生成的配置鮚構體。因此,NGX_DIRECT_CONF
僅由NGX_CORE_MODULE類型的核心模塊使用,而且配置項只應當出現在全局配置中。
*/ //初始化見ngx_init_cycle,所有為http{} server{} location{}分配的空間都由該指針指向新開辟的空間
//NGX_CORE_MODULE類型模塊賦值在ngx_init_cycle
//http{}ngx_http_module相干模塊賦值地方在ngx_http_block
*/
/*
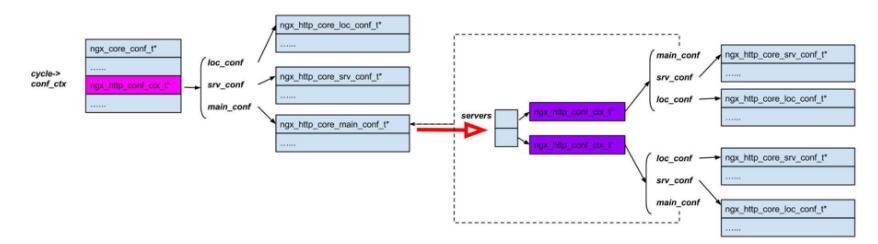
在核心結構體ngx_cycle_t的conf_ctx成員指向的指針數組中,第7個指針由ngx_http_module模塊使用(ngx_http_module模塊的index序號為6,
由于由0開始,所以它在ngx_modules數組中排行第7。在寄存全局配置結構體的conf_ctx數組中,第7個成員指向ngx_http_module模塊),這個指針
設置為指向解析http{}塊時生成的ngx_http_conf_ctx_t結構體,而ngx_http_conf_ctx_t的3個成員則分別指向新分配的3個指針數組。新的指針數組中
成員的意義由每一個HTTP模塊的ctx_index序號指定(ctx_index在HTTP模塊中表明它處于HTTP模塊間的序號),例如,第6個HTTP模塊的ctx_index是5
(ctx_index一樣由0開始計數),那末在ngx_http_conf_ctx_t的3個數組中,第6個成員就指向第6個HTTP模塊的create_main_conf、create_srv_conf、
create_loc_conf方法建立的結構體,固然,如果相應的回調方法沒有實現,該指針就為NULL空指針。
*/
/*
見ngx_init_cycle conf.ctx = cycle->conf_ctx; //這樣下面的ngx_conf_param解析配置的時候,里面對conf.ctx賦值操作,實際上就是對cycle->conf_ctx[i]
可如何由ngx_cycle_t核心結構體中找到main級別的配置結構體呢?Nginx提供的ngx_http_cycle_get_module_main_conf宏可以實現這個功能
*/
void ****conf_ctx; //有多少個模塊就會有多少個指向這些模塊的指針,見ngx_init_cycle ngx_max_module
ngx_pool_t *pool; // 內存池
/* 日志模塊中提供了生成基本ngx_log_t日志對象的功能,這里的log實際上是在還沒有履行ngx_init_cycle方法前,
也就是還沒有解析配置前,如果有信息需要輸出到日志,就會暫時使用log對象,它會輸出到屏幕。
在ngx_init_cycle方法履行后,將會根據nginx.conf配置文件中的配置項,構造出正確的日志文件,此時會對log重新賦值。 */
//ngx_init_cycle中賦值cycle->log = &cycle->new_log;
ngx_log_t *log; //指向ngx_log_init中的ngx_log,如果配置error_log,指向這個配置后面的文件參數,見ngx_error_log。否則在ngx_log_open_default中設置
/* 由nginx.conf配置文件讀取到日志文件路徑后,將開始初始化error_log日志文件,由于log對象還在用于輸出日志到屏幕,
這時候會用new_log對象暫時性地替換log日志,待初始化成功后,會用new_log的地址覆蓋上面的log指針 */
// 如果沒有配置error_log則在ngx_log_open_default設置為NGX_ERROR_LOG_PATH,如果通過error_log有配置過則通過ngx_log_set_log添加到該new_log->next鏈表連接起來
/* 全局中配置的error_log xxx存儲在ngx_cycle_s->new_log,http{}、server{}、local{}配置的error_log保存在ngx_http_core_loc_conf_t->error_log,
見ngx_log_set_log,如果只配置全局error_log,不配置http{}、server{}、local{}則在ngx_http_core_merge_loc_conf conf->error_log = &cf->cycle->new_log; */
//ngx_log_insert插入,在ngx_log_error_core找到對應級別的日志配置進行輸出,由于可以配置error_log不同級別的日志存儲在不同的日志文件中
ngx_log_t new_log;//如果配置error_log,指向這個配置后面的文件參數,見ngx_error_log。否則在ngx_log_open_default中設置
ngx_uint_t log_use_stderr; /* unsigned log_use_stderr:1; */
/* 對poll,rtsig這樣的事件模塊,會以有效文件句柄數來預先建立這些ngx_connection t結構
體,以加速事件的搜集、分發。這時候files就會保存所有ngx_connection_t的指針組成的數組,files_n就是指
針的總數,而文件句柄的值用來訪問files數組成員 */
ngx_connection_t **files; //sizeof(ngx_connection_t *) * cycle->files_n 見ngx_event_process_init ngx_get_connection
/*
從圖9⑴中可以看出,在ngx_cycle_t中的connections和free_connections達兩個成員構成了1個連接池,其中connections指向全部連
接池數組的首部,而free_connections則指向第1個ngx_connection_t空閑連接。所有的空閑連接ngx_connection_t都以data成員(見9.3.1節)作
為next指針串連成1個單鏈表,如此,1旦有用戶發起連接時就從free_connections指向的鏈表頭獲得1個空閑的連接,同時free_connections再指
向下1個空閑連接。而歸還連接時只需把該連接插入到free_connections鏈表表頭便可。
*/ //見ngx_event_process_init, ngx_connection_t空間和它當中的讀寫ngx_event_t存儲空間都在該函數1次性分配好
ngx_connection_t *free_connections;// 可用連接池,與free_connection_n配合使用
ngx_uint_t free_connection_n;// 可用連接池中連接的總數
//ngx_connection_s中的queue添加到該鏈表上
/*
通過讀操作可以判斷連接是不是正常,如果不正常的話,就會把該ngx_close_connection->ngx_free_connection釋放出來,這樣
如果之前free_connections上沒有空余ngx_connection_t,c = ngx_cycle->free_connections;就能夠獲得到剛才釋放出來的ngx_connection_t
見ngx_drain_connections
*/
ngx_queue_t reusable_connections_queue;/* 雙向鏈表容器,元素類型是ngx_connection_t結構體,表示可重復使用連接隊列 表示可以重用的連接 */
//ngx_http_optimize_servers->ngx_http_init_listening->ngx_http_add_listening->ngx_create_listening把解析到的listen配置項信息添加到cycle->listening中
//通過"listen"配置創建ngx_listening_t加入到該數組中
ngx_array_t listening;// 動態數組,每一個數組元素貯存著ngx_listening_t成員,表示監聽端口及相干的參數
/* 動態數組容器,它保存著nginx所有要操作的目錄。如果有目錄不存在,就會試圖創建,而創建目錄失敗就會致使nginx啟動失敗。 */
//通過解析配置文件獲得到的路徑添加到該數組,例如nginx.conf中的client_body_temp_path proxy_temp_path,參考ngx_conf_set_path_slot
//這些配置可能設置重復的路徑,因此不需要重復創建,通過ngx_add_path檢測添加的路徑是不是重復,不重復則添加到paths中
ngx_array_t paths;//數組成員 nginx_path_t ,
ngx_array_t config_dump;
/* 單鏈表容器,元素類型是ngx_open_file_t 結構體,它表示nginx已打開的所有文件。事實上,nginx框架不會向open_files鏈表中添加文件。
而是由對此感興趣的模塊向其中添加文件路徑名,nginx框架會在ngx_init_cycle 方法中打開這些文件 */
//該鏈表中所包括的文件的打開在ngx_init_cycle中打開
ngx_list_t open_files; //如nginx.conf配置文件中的access_log參數的文件就保存在該鏈表中,參考ngx_conf_open_file
//創建ngx_shm_zone_t在ngx_init_cycle,在ngx_shared_memory_add也可能創建新的ngx_shm_zone_t,為每一個ngx_shm_zone_t真正分配同享內存空間在ngx_init_cycle
ngx_list_t shared_memory;// 單鏈表容器,元素類型是ngx_shm_zone_t結構體,每一個元素表示1塊同享內存
ngx_uint_t connection_n;// 當前進程中所有鏈接對象的總數,與connections成員配合使用
ngx_uint_t files_n; //每一個進程能夠打開的最多文件數 賦值見ngx_event_process_init
/*
從圖9⑴中可以看出,在ngx_cycle_t中的connections和free_connections達兩個成員構成了1個連接池,其中connections指向全部連接池數組的首部,
而free_connections則指向第1個ngx_connection_t空閑連接。所有的空閑連接ngx_connection_t都以data成員(見9.3.1節)作為next指針串連成1個
單鏈表,如此,1旦有用戶發起連接時就從free_connections指向的鏈表頭獲得1個空閑的連接,同時free_connections再指向下1個空閑連
接。而歸還連接時只需把該連接插入到free_connections鏈表表頭便可。
在connections指向的連接池中,每一個連接所需要的讀/寫事件都以相同的數組序號對應著read_events、write_events讀/寫事件數組,
相同序號下這3個數組中的元素是配合使用的
*/
ngx_connection_t *connections;// 指向當前進程中的所有連接對象,與connection_n配合使用
/*
事件是不需要創建的,由于Nginx在啟動時已在ngx_cycle_t的read_events成員中預分配了所有的讀事件,并在write_events成員中預分配了所有的寫事件
在connections指向的連接池中,每一個連接所需要的讀/寫事件都以相同的數組序號對應著read_events、write_events讀/寫事件數組,相同序號下這
3個數組中的元素是配合使用的。圖9⑴中還顯示了事件池,Nginx認為每個連接1定最少需要1個讀事件和1個寫事件,有多少連接就分配多少個讀、
寫事件。怎樣把連接池中的任1個連接與讀事件、寫事件對應起來呢?很簡單。由于讀事件、寫事件、連接池是由3個大小相同的數組組成,所以根據數組
序號便可將每個連接、讀事件、寫事件對應起來,這個對應關系在ngx_event_core_module模塊的初始化進程中就已決定了(參見9.5節)。這3個數組
的大小都是由cycle->connection_n決定。
*/
ngx_event_t *read_events;// 指向當前進程中的所有讀事件對象,connection_n同時表示所有讀事件的總數
ngx_event_t *write_events;// 指向當前進程中的所有寫事件對象,connection_n同時表示所有寫事件的總數
/* 舊的ngx_cycle_t 對象用于援用上1個ngx_cycle_t 對象中的成員。例如ngx_init_cycle 方法,在啟動早期,
需要建立1個臨時的ngx_cycle_t對象保存1些變量,
再調用ngx_init_cycle 方法時就能夠把舊的ngx_cycle_t 對象傳進去, 而這時候old_cycle對象就會保存這個前期的ngx_cycle_t對象。 */
ngx_cycle_t *old_cycle;
ngx_str_t conf_file;// 配置文件相對安裝目錄的路徑名稱 默許為安裝路徑下的NGX_CONF_PATH,見ngx_process_options
ngx_str_t conf_param;// nginx 處理配置文件時需要特殊處理的在命令行攜帶的參數,1般是-g 選項攜帶的參數
ngx_str_t conf_prefix; // nginx配置文件所在目錄的路徑 ngx_prefix 見ngx_process_options
ngx_str_t prefix; //nginx安裝目錄的路徑 ngx_prefix 見ngx_process_options
ngx_str_t lock_file;// 用于進程間同步的文件鎖名稱
ngx_str_t hostname; // 使用gethostname系統調用得到的主機名 在ngx_init_cycle中大寫字母被轉換為小寫字母
};配置解析
ngx_init_cycle 提供的是配置解析接口。接口是1個切入點,通過少許代碼提供1個完全功能的調用。配置解析接口分為兩個階段,1個是準備階段,另外一個就是真正開始調用配置解析。準備階段指甚么呢?主要是準備3點:
if (old_cycle->shared_memory.part.nelts) {
        n = old_cycle->shared_memory.part.nelts;
        for (part = old_cycle->shared_memory.part.next; part; part = part->next)
        {
            n += part->nelts;
        }

    } else {
        n = 1;
    }

    if (ngx_list_init(&cycle->shared_memory, pool, n, sizeof(ngx_shm_zone_t))
        != NGX_OK)
    {
        ngx_destroy_pool(pool);
        return NULL;
} log = old_cycle->log;
pool = ngx_create_pool(NGX_CYCLE_POOL_SIZE, log);
if (pool == NULL) {
return NULL;
}
pool->log = log;
cycle = ngx_pcalloc(pool, sizeof(ngx_cycle_t));
if (cycle == NULL) {
ngx_destroy_pool(pool);
return NULL;
}
cycle->pool = pool;
cycle->log = log;
cycle->old_cycle = old_cycle;struct ngx_conf_s {
//當前解析到的命令名
char *name;
//當前命令的所有參數
ngx_array_t *args;
//使用的cycle
ngx_cycle_t *cycle;
//所使用的內存池
ngx_pool_t *pool;
//這個pool將會在配置解析終了后釋放。
ngx_pool_t *temp_pool;
//這個表示將要解析的配置文件
ngx_conf_file_t *conf_file;
//配置log
ngx_log_t *log;
//主要為了提供模塊的層次化(后續會詳細介紹)
void *ctx;
//模塊類型
ngx_uint_t module_type;
//命令類型
ngx_uint_t cmd_type;
//模塊自定義的handler
ngx_conf_handler_pt handler;
//自定義handler的conf
char *handler_conf;
};for (i = 0; ngx_modules[i]; i++) {
if (ngx_modules[i]->type != NGX_CORE_MODULE) {
continue;
}
module = ngx_modules[i]->ctx;
if (module->create_conf) {
rv = module->create_conf(cycle);
if (rv == NULL) {
ngx_destroy_pool(pool);
return NULL;
}
cycle->conf_ctx[ngx_modules[i]->index] = rv;
}
}
conf.ctx = cycle->conf_ctx; // cycle是ngx_cycle_t結構,conf就是ngx_conf_t結構
conf.cycle = cycle;
conf.pool = pool;
conf.log = log;
conf.module_type = NGX_CORE_MODULE; //注意,1開始命令的類型就是MAIN,并且模塊類型是core
conf.cmd_type = NGX_MAIN_CONF;準備好了這些內容,nginx開始調用配置解析模塊,其代碼以下:
if (ngx_conf_param(&conf) != NGX_CONF_OK) {
    environ = senv;
    ngx_destroy_cycle_pools(&conf);
    return NULL;
}
/*開始解析文件 然后來看ngx_conf_parse,這個函數第2個是將要解析的文件名,不過這里還有1個要注意的,那就是第2個參數可以為空的,如果為空,則說明將要解析的是block中的內容或param。*/
if (ngx_conf_parse(&conf, &cycle->conf_file) != NGX_CONF_OK) {
    environ = senv;
    ngx_destroy_cycle_pools(&conf);
    return NULL;
}
第1個if解析nginx命令行參數’-g’加入的配置。第2個if解析nginx配置文件。好的設計就體現在接口極度簡化,模塊之間的耦合非常低。這里只使用區區10行完成了配置的解析
配置解析模塊在 ngx_conf_file.c 中實現。模塊提供的接口函數主要是 ngx_conf_parse,另外模塊提供單獨的接口ngx_conf_param,用來解析命令行傳遞的配置,固然這個接口也是 對ngx_conf_parse的包裝。
ngx_conf_parse 函數支持3種不同的解析環境:
這是1個遞歸的進程。nginx首先解析core模塊的配置。core模塊提供1些塊指令,這些指令引入其他類型的模塊,nginx遇到這些指令,就重新迭代解析進程,解析其他模塊的配置。這些模塊配置中又有1些塊指令引入新的模塊類型或指令類型,nginx就會再次迭代,解析這些新的配置類型。比如上圖,nginx遇到“events”指令,就重新調用ngx_conf_parse()解析event模塊配置,解析完以后ngx_conf_parse()返回,nginx繼續解析core模塊指令,直到遇到“http”指令。nginx再次調用ngx_conf_parse()解析http模塊配置的http級指令,當遇到“server”指令時,nginx又1次調用ngx_conf_parse()解析http模塊配置的server級指令。
//  ngx_conf_parse()解析配置分成兩個主要階段,1個是詞法分析,1個是指令解析。
char *
ngx_conf_parse(ngx_conf_t *cf, ngx_str_t *filename)
{
    char             *rv;
    ngx_fd_t          fd;
    ngx_int_t         rc;
    ngx_buf_t         buf;
    ngx_conf_file_t  *prev, conf_file;
    enum {
        parse_file = 0,
        parse_block,
        parse_param
    } type;

#if (NGX_SUPPRESS_WARN)
    fd = NGX_INVALID_FILE;
    prev = NULL;
#endif

    if (filename) {

        /* open configuration file */
................................................

    } else if (cf->conf_file->file.fd != NGX_INVALID_FILE) {
  //到這里說明接下來解析的是block中的內容
        type = parse_block;

    } else {
    //參數
        type = parse_param;
    }


    for ( ;; ) {
        rc = ngx_conf_read_token(cf);  //此法分析,類似文件內容格式分析

        /*
         * ngx_conf_read_token() may return
         *
         *    NGX_ERROR             there is error
         *    NGX_OK                the token terminated by ";" was found
         *    NGX_CONF_BLOCK_START  the token terminated by "{" was found
         *    NGX_CONF_BLOCK_DONE   the "}" was found
         *    NGX_CONF_FILE_DONE    the configuration file is done
         */
.....................................................

        /* rc == NGX_OK || rc == NGX_CONF_BLOCK_START */
      //如果有handler,則調用handler
        if (cf->handler) {  //handler是自定義解析函數指針

            /*
             * the custom handler, i.e., that is used in the http's
             * "types { ... }" directive
             */

            rv = (*cf->handler)(cf, NULL, cf->handler_conf);
            if (rv == NGX_CONF_OK) {
                continue;
            }

            if (rv == NGX_CONF_ERROR) {
                goto failed;
            }

            ngx_conf_log_error(NGX_LOG_EMERG, cf, 0, rv);

            goto failed;
        }
      //沒有handler則調用默許解析函數
        rc = ngx_conf_handler(cf, rc);

        if (rc == NGX_ERROR) {
            goto failed;
        }
    }

failed:

    rc = NGX_ERROR;

done:
....................................

    return NGX_CONF_OK;
}Nginx的配置文件是分塊的,然后event, http都是1個大的core模塊,然后core模塊中包括了很多2級模塊(epoll/kqeue/proxy..).也就是1級模塊中必須包括1個上下文用來保存2級模塊的配置。而在HTTP模塊中又有1些特殊,那就是HTTP模塊中每一個指令都可能會有3個作用域,那就是main/server/loc,所以在HTTP的上下文中,必須同時保存這3個上下文。
同時Nginx中的命令 有
#define NGX_CONF_ARGS_NUMBER 0x000000ff
#define NGX_CONF_BLOCK       0x00000100
#define NGX_CONF_FLAG        0x00000200
#define NGX_CONF_ANY         0x00000400
#define NGX_CONF_1MORE       0x00000800
#define NGX_CONF_2MORE       0x00001000

#define NGX_DIRECT_CONF      0x00010000

#define NGX_MAIN_CONF        0x01000000
#define NGX_ANY_CONF         0x1F000000
#define NGX_HTTP_MODULE           0x50545448   /* "HTTP" */

#define NGX_HTTP_MAIN_CONF        0x02000000
#define NGX_HTTP_SRV_CONF         0x04000000
#define NGX_HTTP_LOC_CONF         0x08000000
#define NGX_HTTP_UPS_CONF         0x10000000
#define NGX_HTTP_SIF_CONF         0x20000000
#define NGX_HTTP_LIF_CONF         0x40000000
#define NGX_HTTP_LMT_CONF         0x80000000
DIRECT_CONF顧名思義,就是說直接存取CONF,也就是說進入命令解析函數的同時,CONF已創建好了,只需要直接使用就好了(也就是會有create_conf回調)。而Main_conf就是說最頂層的conf,比如HTTP/EVENT/PID等等,可以看到都屬屬于CORE 模塊。而NGX_HTTP_XXX就是所有HTTP模塊的子模塊.
//如果設置了type
            if (!(cmd->type & NGX_CONF_ANY)) {
//首先判斷參數個數是不是合法
                if (cmd->type & NGX_CONF_FLAG) {

                    if (cf->args->nelts != 2) {
                        goto invalid;
                    }

                } else if (cmd->type & NGX_CONF_1MORE) {

                    if (cf->args->nelts < 2) {
                        goto invalid;
                    }
.................................................
            }

            /* set up the directive's configuration context */

            conf = NULL;
//最核心的地方,
            if (cmd->type & NGX_DIRECT_CONF) {
//我們還記得最開始ctx是包括了所有core模塊的conf(create_conf回調),因此這里取出對應的模塊conf.
                conf = ((void **) cf->ctx)[ngx_modules[i]->index];   // NgX_DIRECT_CONF 才有create_conf回調

            } else if (cmd->type & NGX_MAIN_CONF) {
//如果不是DIRECT_CONF并且是MAIN,則說明我們需要在配置中創建自己模塊的上下文(也就是需要進入2級模塊)
                conf = &(((void **) cf->ctx)[ngx_modules[i]->index]);   // MAIN_CONF1般沒有create_conf回調

            } else if (cf->ctx) {
//否則進入2級模塊處理(后續會詳細介紹)。
                confp = *(void **) ((char *) cf->ctx + cmd->conf);

                if (confp) {
                    conf = confp[ngx_modules[i]->ctx_index];
                }
            }
//調用命令的回調函數。
            rv = cmd->set(cf, cmd, conf);

            if (rv == NGX_CONF_OK) {
                return NGX_OK;
            }

            if (rv == NGX_CONF_ERROR) {
                return NGX_ERROR;
            }

            ngx_conf_log_error(NGX_LOG_EMERG, cf, 0,
                               "\"%s\" directive %s", name->data, rv);

            return NGX_ERROR;
        }
上面代碼中2級模塊解析那部份先放1下,首先來看Nginx中帶2級模塊的1級模塊如何解析命令的,來看HTTP模塊(event模塊基本1樣)的解析代碼。
/可以看到沒有direct_conf,由于http包括有2級模塊。
static ngx_command_t  ngx_http_commands[] = {

    { ngx_string("http"),
      NGX_MAIN_CONF|NGX_CONF_BLOCK|NGX_CONF_NOARGS,
      ngx_http_block,
      0,
      0,
      NULL },

      ngx_null_command
};


static char *
ngx_http_block(ngx_conf_t *cf, ngx_command_t *cmd, void *conf)
{
    char                        *rv;
    ngx_uint_t                   mi, m, s;
    ngx_conf_t                   pcf;
    ngx_http_module_t           *module;
    ngx_http_conf_ctx_t         *ctx;
    ngx_http_core_loc_conf_t    *clcf;
    ngx_http_core_srv_conf_t   **cscfp;
    ngx_http_core_main_conf_t   *cmcf;

    /* the main http context */

    ctx = ngx_pcalloc(cf->pool, sizeof(ngx_http_conf_ctx_t));
    if (ctx == NULL) {
        return NGX_CONF_ERROR;
    }
//最核心的地方,可以看到修改了傳遞進來的conf
    *(ngx_http_conf_ctx_t **) conf = ctx;

    /* count the number of the http modules and set up their indices */

    ngx_http_max_module = 0;
    for (m = 0; ngx_modules[m]; m++) {
        if (ngx_modules[m]->type != NGX_HTTP_MODULE) {
            continue;
        }
//然后保存了對應模塊的索引.
        ngx_modules[m]->ctx_index = ngx_http_max_module++;
    }


    /* the http main_conf context, it is the same in the all http contexts */
//創建HTTP對應的conf,由于每一個級別(main/ser/loc)都會包括模塊的conf.
    ctx->main_conf = ngx_pcalloc(cf->pool,
                                 sizeof(void *) * ngx_http_max_module);
    if (ctx->main_conf == NULL) {
        return NGX_CONF_ERROR;
    }


    /*
     * the http null srv_conf context, it is used to merge
     * the server{}s' srv_conf's
     */

    ctx->srv_conf = ngx_pcalloc(cf->pool, sizeof(void *) * ngx_http_max_module);
    if (ctx->srv_conf == NULL) {
        return NGX_CONF_ERROR;
    }


    /*
     * the http null loc_conf context, it is used to merge
     * the server{}s' loc_conf's
     */

    ctx->loc_conf = ngx_pcalloc(cf->pool, sizeof(void *) * ngx_http_max_module);
    if (ctx->loc_conf == NULL) {
        return NGX_CONF_ERROR;
    }


    /*
     * create the main_conf's, the null srv_conf's, and the null loc_conf's
     * of the all http modules
     */
....................................
//保存當前使用的cf,由于我們只是在解析HTTP時需要改變當前的cf,
    pcf = *cf;
//保存當前模塊的上下文
    cf->ctx = ctx;
..........................................

    /* parse inside the http{} block */
//設置模塊類型和命令類型
    cf->module_type = NGX_HTTP_MODULE;
    cf->cmd_type = NGX_HTTP_MAIN_CONF;
//開始解析,這里注意傳遞進去的文件名是空
    rv = ngx_conf_parse(cf, NULL);

    if (rv != NGX_CONF_OK) {
        goto failed;
    }

    /*
     * init http{} main_conf's, merge the server{}s' srv_conf's
     * and its location{}s' loc_conf's
     */
.........................................
    /*
     * http{}'s cf->ctx was needed while the configuration merging
     * and in postconfiguration process
     */
//回復cf
    *cf = pcf;
......................................

    return NGX_CONF_OK;

failed:

    *cf = pcf;

    return rv;
每一個級別都會保存對應的ctx(main/ser/loc),怎樣說呢,就是在解析HTTP main中創建了3個ctx(main/srv/loc),而在HTTP srv block中將會創建2個ctx(main/srv/loc),這時候產生重復了,那就需要merge了。比如1個命令(srv_offset)在HTTP main中有1個,那末Nginx將會把它放入到HTTP main的ctx的srv ctx中,然后server block也有1個,那末Nginx會繼續把它放到Server ctx的 srv_conf中,最后merge他們。
所以我們解析1下server模塊
    { ngx_string("server"),
      NGX_HTTP_MAIN_CONF|NGX_CONF_BLOCK|NGX_CONF_MULTI|NGX_CONF_NOARGS,
      ngx_http_core_server,
      0,
      0,
      NULL },

static char *
ngx_http_core_server(ngx_conf_t *cf, ngx_command_t *cmd, void *dummy)
{
    char                        *rv;
    void                        *mconf;
    ngx_uint_t                   i;
    ngx_conf_t                   pcf;
    ngx_http_module_t           *module;
    struct sockaddr_in          *sin;
    ngx_http_conf_ctx_t         *ctx, *http_ctx;
    ngx_http_listen_opt_t        lsopt;
    ngx_http_core_srv_conf_t    *cscf, **cscfp;
    ngx_http_core_main_conf_t   *cmcf;

    ctx = ngx_pcalloc(cf->pool, sizeof(ngx_http_conf_ctx_t));
    if (ctx == NULL) {
        return NGX_CONF_ERROR;
    }

    http_ctx = cf->ctx;
//main conf不變
    ctx->main_conf = http_ctx->main_conf;

    /* the server{}'s srv_conf */
//創建新的srv和loc conf.
    ctx->srv_conf = ngx_pcalloc(cf->pool, sizeof(void *) * ngx_http_max_module);
    if (ctx->srv_conf == NULL) {
        return NGX_CONF_ERROR;
    }

    /* the server{}'s loc_conf */

    ctx->loc_conf = ngx_pcalloc(cf->pool, sizeof(void *) * ngx_http_max_module);
    if (ctx->loc_conf == NULL) {
        return NGX_CONF_ERROR;
    }
............................

    /* the server configuration context */

    cscf = ctx->srv_conf[ngx_http_core_module.ctx_index];
    cscf->ctx = ctx;


    cmcf = ctx->main_conf[ngx_http_core_module.ctx_index];
//保存所有的servers,可以看到是保存在main中的。這模樣最后在HTTP main中就能夠取到這個srv conf.
    cscfp = ngx_array_push(&cmcf->servers);
    if (cscfp == NULL) {
        return NGX_CONF_ERROR;
    }

    *cscfp = cscf;


    /* parse inside server{} */
//解析,可以看到設置type為srv_conf.
    pcf = *cf;
    cf->ctx = ctx;
    cf->cmd_type = NGX_HTTP_SRV_CONF;

    rv = ngx_conf_parse(cf, NULL);  // 調用ngx_conf_parse函數
//恢復cf.
    *cf = pcf;

  ........................
    }

    return rv;
}
現在來分析上述代碼
struct ngx_command_s {
    ngx_str_t             name;
    ngx_uint_t            type;
    char               *(*set)(ngx_conf_t *cf, ngx_command_t *cmd, void *conf);
//conf就是對應的上下文偏移.比如NGX_HTTP_LOC_CONF_OFFSET
    ngx_uint_t            conf;
    ngx_uint_t            offset;
    void                 *post;
};
............................
            else if (cf->ctx) {
       //獲得對應的1級模塊的2級上下文(HTTP的 srv_offset)
                confp = *(void **) ((char *) cf->ctx + cmd->conf);

                if (confp) {
         //然后取出對應的模塊conf.
                    conf = confp[ngx_modules[i]->ctx_index];
                }
            }
接下來 1些簡單的命令如何使用和配置,主要 看這幾個數據結構
typedef struct {
    void        **main_conf;
    void        **srv_conf;
    void        **loc_conf;
} ngx_http_conf_ctx_t;
// 下面這些就是放到ngx_command_t的conf域,可以看到就是對應conf的偏移
#define NGX_HTTP_MAIN_CONF_OFFSET  offsetof(ngx_http_conf_ctx_t, main_conf)
#define NGX_HTTP_SRV_CONF_OFFSET   offsetof(ngx_http_conf_ctx_t, srv_conf)
#define NGX_HTTP_LOC_CONF_OFFSET   offsetof(ngx_http_conf_ctx_t, loc_conf)
//

//下面就是如何來取模塊的配置
#define ngx_http_get_module_main_conf(r, module)                             \
    (r)->main_conf[module.ctx_index]
#define ngx_http_get_module_srv_conf(r, module)  (r)->srv_conf[module.ctx_index]
#define ngx_http_get_module_loc_conf(r, module)  (r)->loc_conf[module.ctx_index]
#define ngx_http_conf_get_module_main_conf(cf, module)                        \
    ((ngx_http_conf_ctx_t *) cf->ctx)->main_conf[module.ctx_index]
#define ngx_http_conf_get_module_srv_conf(cf, module)                         \
    ((ngx_http_conf_ctx_t *) cf->ctx)->srv_conf[module.ctx_index]
#define ngx_http_conf_get_module_loc_conf(cf, module)                         \
    ((ngx_http_conf_ctx_t *) cf->ctx)->loc_conf[module.ctx_index]

#define ngx_http_cycle_get_module_main_conf(cycle, module)                    \
    (cycle->conf_ctx[ngx_http_module.index] ?                                 \
        ((ngx_http_conf_ctx_t *) cycle->conf_ctx[ngx_http_module.index])      \
            ->main_conf[module.ctx_index]:                                    \
NULL)其實不是所有的模塊像http有3個級別(main/srv/loc)比如stream和mail模塊只有兩個級別(main/srv)),但是整體解析流程都是 1致的,所以學習了1個模塊,就能夠很清楚其他模塊,只是具體的handler不1樣而已。接下來的博客將要介紹全部Nginx的全部框架 的流程

上一篇 IOS 藍牙介紹
程序員人生,我編程,我富裕,記住wfuyu網,php教程,php學習,php手冊,CMS模版制作
聲明:本站大部分內容是作者原創,少部分收集于互聯網供大家一起學習,原版權很多不明,如有侵權請聯系本站,謝謝!
粵ICP備14040726號-1?? 2015-2020 程序員人生 版權所有


